De meesten van ons kennen het wel: een kamer die er prachtig uitziet in een tijdschrift, maar in het echt vreemd vlak of hard aanvoelt, ondanks het feit dat je meer armaturen hebt toegevoegd en helderdere lampen hebt geplaatst. Het instinct om simpelweg meer licht toe te voegen is begrijpelijk, maar lost zelden het diepere probleem op. Wat een kamer werkelijk transformeert van voldoende naar buitengewoon, is een weloverwogen proces genaamd kamerverlichtingsassessment, een methode die evalueert hoe licht zich gedraagt in jouw specifieke ruimte en elk armatuur, elke laag en elke lumen afstemt op de manier waarop jij daadwerkelijk leeft. Deze gids neemt je mee door alles, van de kernconcepten tot de praktische berekeningen die een echt verschil maken.
Inhoudsopgave
- Wat is kamerverlichtingsassessment?
- De wetenschap van licht: Kernmethodologie, meting en standaarden
- Voorbij helderheid: De kunst van gelaagde verlichting
- De nuances navigeren: Uitzonderlijke gevallen en praktische doe-het-zelf-oplossingen
- Het menselijke element: Wat de meeste verlichtingsgidsen missen
- Jouw persoonlijke verlichtingsreis begint hier met Find a Lamp
- Veelgestelde vragen
Belangrijkste inzichten
| Punt | Details |
|---|---|
| Basisprincipes van assessment | Kamerverlichtingsassessment evalueert lichtniveaus, indeling en sfeer voor optimaal comfort en functie. |
| Volg benchmarks | Kamers moeten overeenkomen met aanbevolen lux-niveaus voor hun doel, om onder- of oververlichting te voorkomen. |
| Laagjes zijn belangrijk | Combineer algemene, taak- en accentverlichting voor flexibiliteit en sfeer, gebruik indien mogelijk dimmers. |
| Doe-het-zelf-tools helpen | Plattegronden, calculators en apps maken verlichtingsassessment toegankelijk voor huiseigenaren en huurders. |
| Aanpassen voor uitzonderingen | Hoge plafonds, afwerkingen en daglicht vereisen aanpassingen; uniformiteit en onderhoud zorgen voor duurzame resultaten. |
Wat is kamerverlichtingsassessment?
Nu je begrijpt dat er meer nodig is dan alleen extra lampen, laten we het proces definiëren dat een comfortabele, functionele sfeer garandeert.
In de kern is kamerverlichtingsassessment "het proces van het evalueren en berekenen van de juiste verlichtingsniveaus, armatuurplaatsing en gelaagdheid voor een kamer om optimale verlichtingssterkte (lux), uniformiteit en sfeer te bereiken op basis van kamerfunctie, grootte en activiteiten." Die definitie bevat verschillende belangrijke termen die één voor één moeten worden uitgelegd, omdat elk direct van invloed is op hoe jouw ruimte aanvoelt en functioneert.
Laten we de drie belangrijkste uitsplitsen:
-
Verlichtingssterkte (Lux): Dit is de hoeveelheid licht die op een oppervlak valt, gemeten in lux (één lux is gelijk aan één lumen per vierkante meter). Zie het als de helderheid van de oppervlakken die je ziet. Te weinig, en een kamer voelt somber en onbruikbaar; te veel, en het is hard en overweldigend.
-
Uniformiteit: Dit verwijst naar hoe gelijkmatig licht zich verspreidt over de ruimte. Stel je een bureau voor met een heldere plek direct onder een lamp, maar al het andere ligt in de schaduw – dat is slechte uniformiteit. Goede uniformiteit zorgt voor een comfortabele visuele ervaring, minimaliseert oogvermoeidheid en zorgt ervoor dat de hele kamer evenwichtig aanvoelt, zonder scherpe contrasten tussen lichte en donkere gebieden.
-
Sfeer: Dit is de emotionele atmosfeer die wordt gecreëerd door de combinatie van lichthoeveelheid, kleurtemperatuur en richting die samenwerken. Het is het "gevoel" van de kamer. Sfeer transformeert een simpele ruimte in een gastvrij toevluchtsoord of een energieke hub. Het is wat een slaapkamer gezellig maakt of een keuken levendig.
Deze drie factoren zijn onlosmakelijk met elkaar verbonden. Je zou een perfect lux-niveau kunnen bereiken, maar de sfeer vernietigen als het licht hard en op de verkeerde manier uniform is (denk aan een verhoorkamer, niet aan een woonkamer). De IES-verlichtingsnormen, gepubliceerd door de Illuminating Engineering Society, bieden de benchmarks die professionals gebruiken om dit evenwicht te navigeren, en ze zijn de moeite waard om als referentie op te slaan. Deze normen gaan niet alleen over helderheid; ze houden rekening met visueel comfort, taakprestaties en energie-efficiëntie, en bieden een holistische benadering van verlichtingsontwerp.
Gelaagdheid en armatuurplaatsing vormen de kern van elk goed assessment. In plaats van te vertrouwen op een enkele plafondbron, positioneert assessment-gedreven ontwerp strategisch meerdere armaturen om tegelijkertijd verschillende doelen te dienen. Onze kamer-voor-kamer verlichtingsgids onderzoekt hoe elke ruimte in je huis unieke eisen stelt, van de gerichte taakverlichting die een keuken vraagt tot de warme, omhullende gloed waar een slaapkamer naar snakt.
"Een goed verlichtingsassessment telt niet alleen lumens, het choreografeert ze zo dat elke hoek van een kamer zijn plaats verdient in de compositie."
Belangrijke concepten uit dit deel om mee te nemen:
- Lux meet de verlichtingssterkte op oppervlakteniveau (hoeveel licht arriveert).
- Lumens meten de totale lichtopbrengst van een bron (hoeveel licht wordt uitgestraald).
- Uniformiteitsverhouding beschrijft hoe gelijkmatig licht wordt verdeeld (min lux / gemiddeld lux).
- Sfeer wordt gevormd door kleurtemperatuur, richting en gelaagdheid, niet alleen door helderheid.
De wetenschap van licht: Kernmethodologie, meting en standaarden
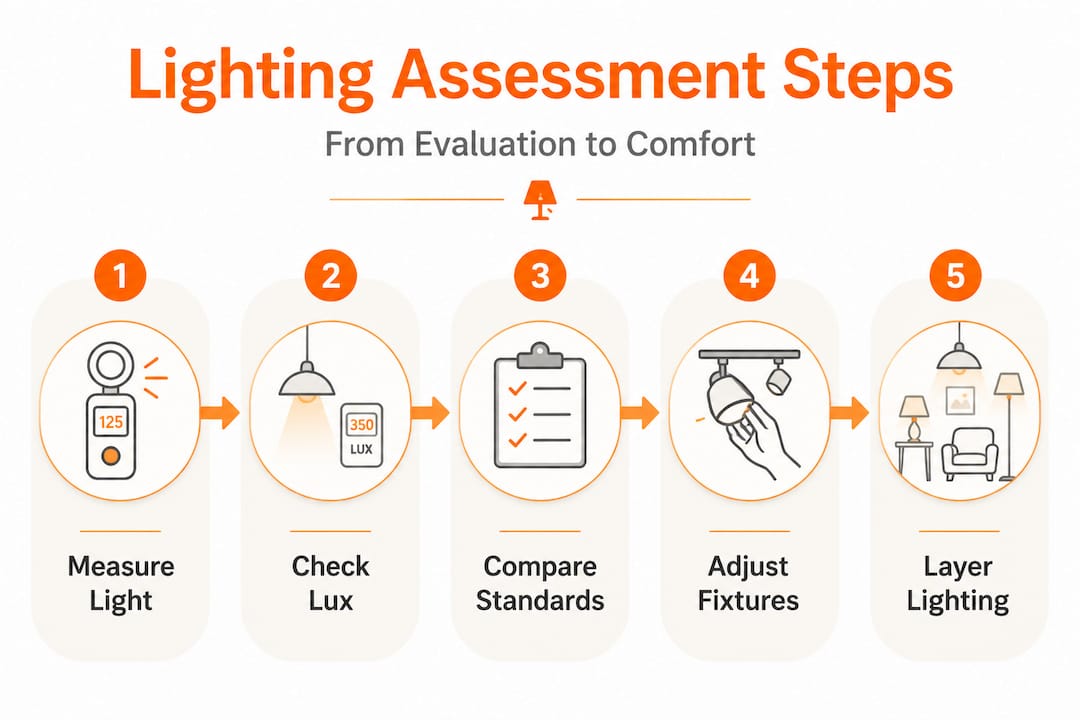
Met een duidelijk begrip van wat assessment inhoudt, laten we eens kijken hoe professionals en slimme doe-het-zelvers daadwerkelijk een verlichtingsassessment uitvoeren, van metingen tot standaarden.
Het professionele kader voor kamerverlichtingsassessment, zoals uiteengezet door verlichtingsberekeningstools, omvat "het meten van het kamergebied, het selecteren van de doelverlichtingssterkte per kamertype en activiteit, rekening houdend met plafondhoogte, kamerafwerkingen, daglicht, lichtverliesfactor (LLF 0,7-0,9) en benuttingsfactor (CU 0,3-0,85)." Elk van deze variabelen speelt een afzonderlijke rol in de uiteindelijke berekening, en zelfs een ruw begrip ervan geeft je een voorsprong op de gemiddelde huiseigenaar die gokt op het wattage van lampen.
Hier is een eenvoudig stapsgewijs proces om je op weg te helpen:
-
Meet je kamer. Begin met de basis! Bereken de vloeroppervlakte in vierkante meters (lengte x breedte). Noteer de plafondhoogte afzonderlijk, aangezien deze aanzienlijk van invloed is op hoe licht zich verspreidt. Een hoger plafond betekent dat licht verder moet reizen, wat krachtigere bronnen of meer armaturen vereist.
-
Selecteer je doellux-niveau. Gebruik de onderstaande tabel als leidraad. Onthoud dat verschillende activiteiten binnen dezelfde kamer verschillende niveaus nodig kunnen hebben, dus plan voor zones. Een keuken heeft bijvoorbeeld hogere lux-waarden boven aanrechten dan in een informele eethoek.
-
Bereken de benodigde totale lumens. Hier begint de magie. Vermenigvuldig je doellux met de oppervlakte van de kamer (in vierkante meters). Deel dit vervolgens door de CU (benuttingsfactor, typisch 0,5 voor een gemiddelde kamer met middentonen afwerkingen). De CU houdt rekening met hoe efficiënt je armaturen licht leveren aan het werkvlak, rekening houdend met de vorm van de kamer en de reflectie van oppervlakken.
-
Pas de LLF (lichtverliesfactor) toe. Deel je resultaat door de LLF (meestal rond de 0,8) om rekening te houden met de geleidelijke afname van lampen en armatuurefficiëntie over tijd. Lampen dimmen met de leeftijd en stof hoopt zich op armaturen, waardoor hun output afneemt. De LLF zorgt ervoor dat je verlichting adequaat blijft gedurende de levensduur.
-
Verdeel over armaturen. Deel ten slotte de benodigde totale lumens door de werkelijke lumenopbrengst van de door jou gekozen lamp of armatuur om te bepalen hoeveel je er nodig hebt. Deze stap helpt je te beslissen of je twee hanglampen, vier inbouwspots of een combinatie nodig hebt.
Aanbevolen lux-benchmarks per kamertype
De volgende lux-benchmarks bieden een betrouwbare basis voor woonruimtes. Onthoud dat dit richtlijnen zijn; persoonlijke voorkeur en specifieke activiteiten kunnen je iets hoger of lager doen uitkomen.
| Kamer | Algemeen lux-bereik | Lux werkgebied |
|---|---|---|
| Woonkamer | 100 tot 300 lux | 300 tot 500 lux (lezen, hobby's) |
| Slaapkamer | 100 tot 200 lux | 300 lux (make-up, lezen) |
| Keuken | 150 tot 300 lux | 300 tot 500+ lux (aanrechten, spoelbak) |
| Badkamer | 200 tot 500 lux | 500+ lux (spiegel) |
| Hal | 50 tot 150 lux | N.v.t. |
De kamerindex K (ook wel kamerholteverhouding genoemd) is een dimensieloos getal dat de geometrie van je kamer beschrijft ten opzichte van de armaturen. Een lage K-waarde betekent een smalle, hoge kamer waar licht ver moet reizen om de vloer te bereiken, waardoor het moeilijker is om uniform licht te verkrijgen. Een hoge K-waarde betekent een brede kamer met een laag plafond waar licht gemakkelijker verspreidt. De meeste online calculators behandelen K automatisch, maar weten dat het bestaat helpt je te interpreteren waarom een grote open keuken minder armaturen nodig heeft dan een smalle galerij van hetzelfde vloeroppervlak.
Pro Tip: Bij het ontwerpen van initiële verlichting, streef naar 20 tot 30 procent meer lumens dan je uiteindelijke doel. Lampen degraderen na verloop van tijd, en deze buffer zorgt ervoor dat je ruimte gedurende de levensduur van het armatuur boven de minimale comfortabele lux-drempel blijft. Deze praktijk van ontwerpen boven het doel wordt de onderhoudsfactor genoemd, en het waarborgt langdurig comfort zonder vroege vervanging van armaturen te vereisen.
Onze gids voor gelaagde verlichting gaat dieper in op deze berekeningen en laat zien hoe je ze in een samenhangend ontwerpplan kunt verweven. Voor nog meer diepgaande informatie, verken onze verlichtingsinzichten voor de nieuwste ideeën over residentieel ontwerp.
Voorbij helderheid: De kunst van gelaagde verlichting
Na het berekenen van de juiste verlichtingsniveaus, zorgt het combineren van verschillende soorten verlichting ervoor dat je ruimte gastvrij aanvoelt en geschikt is voor elke activiteit.
Gelaagde verlichting is de gouden standaard in de designindustrie: "Algemeen (overall), Taak (gericht werk), Accent (decoratief). Combineer 2-3 lagen per kamer met dimmers voor flexibiliteit." Elke laag dient een specifieke functie, en de magie ontstaat wanneer ze samenwerken in plaats van om aandacht te concurreren.
De drie lagen uitgelegd
| Laag | Primair doel | Beste armatuurtypes | Ideale toepassingen |
|---|---|---|---|
| Algemeen | Algemene verlichting, stelt basislux in | Inbouwspots, plafondhanglampen, opbouwlampen, railsystemen | Algehele helderheid van de kamer, veiligheid, navigatie, creëren van een basisgloed |
| Taak | Gericht, hogere lux-verlichting voor specifieke activiteiten | Onderbouwstrips, bureaulampen, spiegelverlichting, vloerlampen met verstelbare koppen | Lezen, koken, make-up aanbrengen, werken, hobby's, gedetailleerde knutselprojecten |
| Accent | Decoratief, creëert diepte en visuele interesse, benadrukt kenmerken | Wandlampen, schilderijverlichting, LED-strips, uplighters, kleine spotlights, kastverlichting | Kunst, architectonische kenmerken, gestructureerde muren, planten, boekenkasten benadrukken |
De gids voor gelaagde verlichting die we hebben samengesteld, gaat buitengewoon gedetailleerd in op armatuurcombinaties voor elk kamertype, maar hier zijn de belangrijkste doe-het-zelf-strategieën om lagen effectief te combineren:
-
Installeer dimmers op elk circuit dat je kunt. Dit is niet onderhandelbaar! Een dimmer transformeert een enkel armatuur in een multifunctioneel hulpmiddel, waardoor je een woonkamer krijgt die helder is voor de zondagsbrunch en intiem voor een zaterdagavond zonder een enkele lamp te verwisselen. Dimmers bieden ongeëvenaarde flexibiliteit en controle over de sfeer van je ruimte.
-
Layer van plafond naar beneden. Zie het als het strategisch opbouwen van je verlichtingsontwerp. Begin met algemene verlichting om een comfortabele basis te leggen, voeg vervolgens taakverlichting toe precies waar activiteiten plaatsvinden, en introduceer ten slotte accentverlichting als een sculpturale versiering om persoonlijkheid en diepte toe te voegen. Dit sequentiële denken voorkomt oververlichting en zorgt ervoor dat elk armatuur een duidelijk doel heeft.
-
Vermijd symmetrie voor accentverlichting. Hoewel algemene verlichting vaak baat heeft bij een gelijkmatige verdeling, kunnen perfect gecentreerde accentarmaturen statisch en voorspelbaar aanvoelen. Verschuif ze om visuele spanning en diepte te creëren, op de manier waarop een ervaren fotograaf asymmetrie gebruikt om een compositie levendig te maken. Denk na over hoe licht en schaduw samenspelen om drama te creëren.
-
Verwarm je accentlaag. Taakverlichting neigt naar koelere, neutrale tinten (3000 tot 4000 Kelvin) voor helderheid en focus. Accentverlichting daarentegen profiteert bijna altijd van een warmere gloed (2200 tot 2700 Kelvin) om uitnodigend, gezellig en kunstzinnig aan te voelen in plaats van klinisch. Deze warmte versterkt texturen en kleuren, waardoor een kamer gastvrijer aanvoelt.
-
Test voordat je je vastlegt. Gebruik inplugbare wandlampen, op batterijen werkende LED-strips, of zelfs gewoon een zaklamp om te experimenteren met accentplaatsing en stralingshoeken voordat je in muren of plafonds snijdt. Deze aanpak bespaart aanzienlijk tijd, kosten en mogelijke hoofdpijn, waardoor je je ontwerp in realtime kunt visualiseren en verfijnen.
Denken aan je kamer als een plek waar drie verschillende verlichtingsgesprekken tegelijk plaatsvinden, in plaats van één luide monoloog van bovenaf, verandert alles over hoe je armaturen koopt en positioneert. Het gaat om het creëren van een dynamische, aanpasbare omgeving die echt jouw levensstijl weerspiegelt.
De nuances navigeren: Uitzonderlijke gevallen en praktische doe-het-zelf-oplossingen
Naast de basiskennis presenteren veel kamers unieke uitdagingen, maar eenvoudige strategieën en tools kunnen iedereen helpen geweldige resultaten te bereiken.
De standaard lumenmethode werkt prachtig voor een gemiddelde kamer met 8-voet plafonds en muren in middentonen. Echte huizen zijn natuurlijk zelden gemiddeld. Verschillende belangrijke uitzonderlijke gevallen verdienen specifieke aandacht: "Hoge plafonds vereisen meer lumens (inverse kwadratenwet); donkere afwerkingen verlagen de CU; ouderen/mensen met slecht zicht hebben hogere lux nodig (500+); daglicht vermindert de behoefte aan kunstlicht."
-
Hoge plafonds zijn misschien wel de meest voorkomende uitdaging. De inverse kwadratenwet vertelt ons dat de lichtintensiteit dramatisch afneemt met de afstand. Verdubbel de plafondhoogte en je verviervoudigt ruwweg de benodigde lumens om dezelfde lux op vloerniveau te bereiken. In een kamer met 12-voet plafonds moeten inbouwspots vaak worden aangevuld met vloerlampen, opvallende kroonluchters die lager hangen, of wandlampen op middelhoogte die licht dichter bij de plek brengen waar mensen daadwerkelijk leven en interageren.
-
Donkere afwerkingen op muren, plafonds en vloeren absorberen licht in plaats van het te reflecteren, waardoor de benuttingsfactor (CU) van je kamer effectief wordt verlaagd. Een kamer geschilderd in diep antraciet of bekleed met donker houten lambrisering heeft mogelijk 30 tot 40 procent meer lumens nodig dan dezelfde kamer in wit of lichte neutrale tinten. Het gebruik van lichtere afwerkingen op ten minste het plafond verbetert de lichtverdeling en de waarneming van helderheid dramatisch, zelfs als muren en vloeren donker blijven.
-
Ouder wordende ogen en behoeften van mensen met slecht zicht worden vaak over het hoofd gezien in residentieel ontwerp, maar ze zijn van cruciaal belang voor comfort en veiligheid. Volwassenen boven de 60 hebben doorgaans twee tot drie keer meer verlichting nodig dan jongere mensen om dezelfde visuele helderheid te bereiken. Het richten op 500 lux of hoger in activiteitsgebieden, gecombineerd met bronnen met een hogere CRI (kleurweergave-index) boven de 90, maakt een diepgaand functioneel verschil. Overweeg helderdere, diffuse taakverlichting en vermijd harde schaduwen. Verken onze kamerverlichtingsgids voor specifieke armatuuraanbevelingen die op een elegante manier aan deze behoeften voldoen.
-
Daglichtintegratie is een van de krachtigste beschikbare hulpmiddelen. Een op het zuiden gerichte woonkamer met grote ramen heeft op een heldere middag mogelijk geen enkele algemene kunstmatige verlichting nodig. Houd rekening met daglicht in je assessment door te noteren hoeveel natuurlijk licht je ruimte binnenkomt op verschillende tijdstippen van de dag, en stem je kunstmatige systeem af om het aan te vullen in plaats van te dupliceren. Dit heeft ook aanzienlijke energiebesparende voordelen.
Handige doe-het-zelf-tools om je eigen assessment uit te voeren:
- Smartphone luxmeter-apps: Hoewel niet laboratoriumnauwkeurig, geven apps zoals Lux Light Meter Pro voor iOS of Lux Meter voor Android je een uitstekende real-time schatting van lichtniveaus, zodat je schemerige gebieden of plekken met overmatige helderheid kunt identificeren.
- Online lumen calculator tools: Veel websites bieden gratis calculators die LLF, CU en zelfs de kamerindex automatisch afhandelen, waardoor de complexe wiskunde voor jou wordt vereenvoudigd. Vul gewoon je kamerdimensies en gewenste lux in.
- Papieren of digitale plattegrondschetsen: Door je kamer in kaart te brengen, kun je de plaatsing van armaturen visualiseren, potentiële schaduwen identificeren en je verlichtingszones effectief plannen. Eenvoudige schetsen kunnen kostbare fouten voorkomen.
- Kleurtemperatuur-samplerkaarten: Deze kaarten, vaak gratis verkrijgbaar bij verlichtingsleveranciers, laten je zien hoe verschillende Kelvin-temperaturen (bijv. 2700K, 3000K, 4000K) er daadwerkelijk uitzien, wat je helpt de juiste "warmte" of "koelte" voor verschillende gebieden te kiezen.
- Smart bulb starterkits: Deze maken real-time dimmen en kleurtemperatuurtesten direct in je ruimte mogelijk. Je kunt experimenteren met verschillende instellingen om te vinden wat het beste aanvoelt voordat je investeert in permanente armaturen.
Pro Tip: CRI (kleurweergave-index) is net zo belangrijk als lux in ruimtes waar je kleur beoordeelt, of je nu kookt, je aankleedt of aan een creatief project werkt. Streef naar CRI 90+ in keukens, badkamers en studio's om ervoor te zorgen dat kleuren natuurgetrouw worden weergegeven. Voor woonkamers en slaapkamers creëert CRI 80+ bij een warme kleurtemperatuur van 2700K die omhullende, flatterende gloed die geen enkele koudwitte lamp kan repliceren. Lampen met een hoge CRI laten alles in je huis er beter uitzien!
Het menselijke element: Wat de meeste verlichtingsgidsen missen
De meeste verlichtingsgidsen stoppen bij de wiskunde, geven je een lux-tabel en wensen je veel succes. Maar de kloof tussen technisch correcte verlichting en werkelijk mooie, leefbare verlichting is breder dan welke formule dan ook kan overbruggen.
De evoluerende aard van standaarden maakt dit bijzonder duidelijk: studies hebben aangetoond dat kantooromgevingen die voorheen waren ontworpen voor 1000 lux, net zo goed, soms zelfs beter, presteren bij 500 lux wanneer gelaagdheid en controle zijn geoptimaliseerd. Standaarden werden naar beneden bijgesteld, niet omdat we luier werden, maar omdat onderzoekers zich realiseerden dat uniformiteit, verblindingscontrole en kleurkwaliteit zwaarder wegen dan pure helderheid in de menselijke ervaring. Residentiële verlichting is nog flexibeler, omdat de primaire taak van een huis is om emotioneel goed aan te voelen, niet alleen technisch voldoende.
We hebben huiseigenaren obsessief lux-getallen zien najagen, wat resulteerde in ruimtes die aanvoelden als goed verlichte ziekenhuisgangen. Technisch perfect. Menselijk onaangenaam. De waarheid die we zijn gaan waarderen, is dat standaarden een ondergrens zijn, geen bovengrens. Ze vertellen je het minimum dat nodig is voor veiligheid en taakprestaties. Ze zeggen absoluut niets over sfeer, warmte of de specifieke manier waarop het middaglicht over een geliefd meubelstuk moet vallen. Een kamer kan perfect helder zijn, maar steriel aanvoelen door slechte kleurtemperatuurkeuzes of een gebrek aan visuele interesse door accentverlichting.
De meest comfortabele huizen die we tegenkomen, balanceren de nauwkeurigheid van een goede assessment met de intuïtie van een doorleefd perspectief. Ze gebruiken dimmers niet als luxe kenmerken, maar als essentiële bedieningselementen. Ze plaatsen accentarmaturen om textuur te onthullen op een manier die een kamer driedimensionaal in plaats van vlak doet aanvoelen. Ze leggen doordacht lagen aan en passen deze vervolgens aan op gevoel in plaats van op formule. Deze intuïtieve aanpassing, dit "aanvoelen", is waar de kunst van verlichting echt tot leven komt. Het gaat erom te luisteren naar je ruimte en je eigen comfort, niet alleen om cijfers te kraken.
Ons perspectief: behandel de lumenmethode als je startpunt en je persoonlijke comfort als het laatste woord. Assessments geven je een kaart. Ze besturen de auto niet. Vertrouw op je ogen, je stemming en hoe een ruimte je doet voelen.
Jouw persoonlijke verlichtingsreis begint hier met Find a Lamp
Zodra je je verlichtingsbehoeften via een gedegen assessment in kaart hebt gebracht, begint het echt spannende deel: het vinden van armaturen die zowel functioneel precies als visueel verbluffend zijn.
Bij Find a Lamp overbrugt ons AI-gestuurde platform de kloof tussen assessment en aankoop. Vergeet eindeloos scrollen en gissen. Upload een foto van je kamer, en ons intelligente systeem analyseert de indeling, afwerkingstinten, plafondhoogte en bestaande armaturen. Vervolgens vergelijkt het deze gegevens met je gewenste activiteiten en esthetische voorkeuren om lampen aan te bevelen die precies passen bij jouw functionele eisen en ontwerpgevoel. Of je nu op zoek bent naar
Blader door onze uitgebreide catalogus lampen met directe links om te kopen bij vertrouwde retailers.Misschien vind je deze lampen ook leuk