Ooit een keuken binnengelopen die gewoon *goed* voelde? Waar elke hoek helder was, elke taak gemakkelijk, en de sfeer moeiteloos verschoof van drukke ochtendvoorbereidingen naar gezellige avondmaaltijden? De kans is groot dat het niet alleen de kasten of het aanrecht waren die voor magie zorgden – het was de verlichting. Slechte keukenverlichting is zo’n subtiele saboteur die je voelt voordat je het kunt benoemen. Schaduwen vallen over je snijplank, de ruimte voelt kleiner en vlakker aan dan hij is, en geen enkele hoeveelheid verse verf lijkt de dofheid te verhelpen. Maar hier is het geheim: het transformeren van de sfeer en functionaliteit van je keuken is eenvoudiger dan je denkt, beginnend met een briljant lichtplan.
Deze uitgebreide gids snijdt door de verwarring heen en pakt de veelvoorkomende valkuilen aan die de meeste huiseigenaren tegenkomen: het kiezen van het verkeerde type lamp voor de klus, het volledig overslaan van de planningsfase en het behandelen van decoratieve armaturen als de enige oplossing. We duiken diep in lumen-doelen, de kracht van gelaagde verlichting, slimme armatuurtypes, slimme indelingsregels en de installatie-nuances die zelfs ervaren doe-het-zelvers in de problemen brengen. Maak je klaar om je keuken als een professional te verlichten!
Inhoudsopgave
- Belangrijkste Lessen voor een Lichtere Keuken
- Jouw Keuzegids voor Keukenverlichting: Ken Eerst de Basis
- Je Keukenverlichtingsplan Maken: De Blauwdruk voor Briljantie
- Armaturen en Lampen Slim Kiezen: Stijl Ontmoet Functionaliteit
- Slimme Verlichting en Bediening: De Toekomst is Nu
- Installatietips en Fouten om te Vermijden: Soepel Zeilen
- Mijn Visie op Wat een Keuken Werkelijk Transformeert
- Zie Jouw Keukenverlichting Tot Leven Komen met Findalamp
- Veelgestelde Vragen
Belangrijkste Lessen voor een Lichtere Keuken
| Punt | Details |
|---|---|
| Laag Je Verlichting | Combineer algemene, taak-, accent- en decoratieve armaturen voor volledige dekking, sfeerbeheersing en visuele diepte. |
| Haal Je Lumen-doelen | Streef naar 50 tot 75 lumen per vierkante meter voor algemeen licht, en een gerichte 1.500 tot 2.000 lumen per taakarmatuur voor kritieke werkzones. |
| Plan Voordat Je Koopt | Maak een gedetailleerd lichtplan, inclusief armatuurplaatsing, bedradingsroutes en schakelposities, *voordat* je iets koopt. |
| Combineer Dimmers met LED's | Controleer altijd de LED-compatibiliteit op elke dimmer om frustrerend flikkeren, zoemen of voortijdig uitvallen van de lamp te voorkomen. |
| Plaats Inbouwspots Nauwkeurig | Plaats inbouwspots 45 tot 60 centimeter van wandkasten om ervoor te zorgen dat licht direct op het aanrecht valt, waardoor hinderlijke schaduwen worden geëlimineerd. |
| Prioriteer CRI & Kelvin | Kies lampen met een Color Rendering Index (CRI) van 90+ en een kleurtemperatuur (Kelvin) tussen 3000K-4000K voor accurate voedselkleuren en een comfortabele sfeer. |
Jouw Keuzegids voor Keukenverlichting: Ken Eerst de Basis
Voordat je halsoverkop verliefd wordt op een prachtige hanglamp, moet je de fundamentele eisen van je keuken begrijpen op het gebied van ruwe lichtopbrengst en kleurkwaliteit. Deze twee factoren vormen de ononderhandelbare basis die elke daaropvolgende ontwerpbeslissing vormgeeft. Zie het als de wetenschap achter de sprankeling!
Hoeveel Licht Heeft Je Keuken Werkelijk Nodig? Lumen & Lux Uitgelegd
Laten we het over cijfers hebben. Algemene sfeerverlichting voor een keuken moet 50 tot 75 lumen per vierkante meter leveren. Dit betekent dat als je een gezellige keuken van 15 vierkante meter hebt, je tussen de 7.500 en 11.250 totale lumen nodig hebt, verspreid over al je algemene verlichtingsarmaturen. Dit gaat niet alleen om helderheid; het gaat om het creëren van een comfortabele, gelijkmatig verlichte basis voor je ruimte.
Maar keukens zijn niet alleen voor een algemene gloed. Het zijn bruisende werkplaatsen! Taakverlichting boven kritieke werkzones zoals aanrechtbladen, kookeilanden, kookplaten en spoelbakken vraagt aanzienlijk meer gericht licht. We hebben het over 1.500 tot 2.000 lumen *per taakarmatuur*. Dit zijn geen decoratievoorkeuren; het zijn functionele drempels die zijn ontworpen om oogvermoeidheid te voorkomen, de veiligheid te verbeteren en koken een plezier te maken, geen karwei. Zonder adequate taakverlichting zul je constant worstelen met schaduwen, hoe helder je plafondlampen ook zijn.
Kleurtemperatuur: De Sfeer Bepalen en Helderheid Verbeteren (Kelvin)
Naast helderheid heeft de *kleur* van je licht een dramatische invloed op het gevoel en de functionaliteit van je keuken. Gemeten in Kelvin (K), bepaalt de kleurtemperatuur of je licht warm en uitnodigend aanvoelt, of koel en helder. Het aanbevolen bereik voor de keuken ligt comfortabel tussen 3000K en 4000K. Dit is waarom:
- 3000K (Warm Wit): Deze warmere tint is perfect voor traditionele of landelijke keukens, of voor degenen die een gezelligere, uitnodigendere avondsfeer prefereren. Het bootst de zachte gloed van gloeilampen na, waardoor je keuken aanvoelt als een comfortabel toevluchtsoord.
- 3500K-4000K (Neutraal tot Koel Wit): Deze koelere tinten verbeteren de visuele helderheid aanzienlijk, waardoor ze ideaal zijn voor moderne keukens of ruimtes waar veeleisend voorbereidingswerk een dagelijkse routine is. Ze bieden een uitstekende kleurweergave, waardoor het gemakkelijker is om ingrediënten te onderscheiden en de gaarheid van voedsel nauwkeurig te beoordelen. Denk aan levendige groenten en rode kleuren!
Pro Tip: Vermijd alles boven 5000K, tenzij je streeft naar de steriele, klinische sfeer van een ziekenhuisgang. Hoewel ze ogenschijnlijk "helderder" zijn, kunnen deze koele temperaturen hard en onflatteus zijn, en je keuken minder als een thuis en meer als een laboratorium laten aanvoelen.
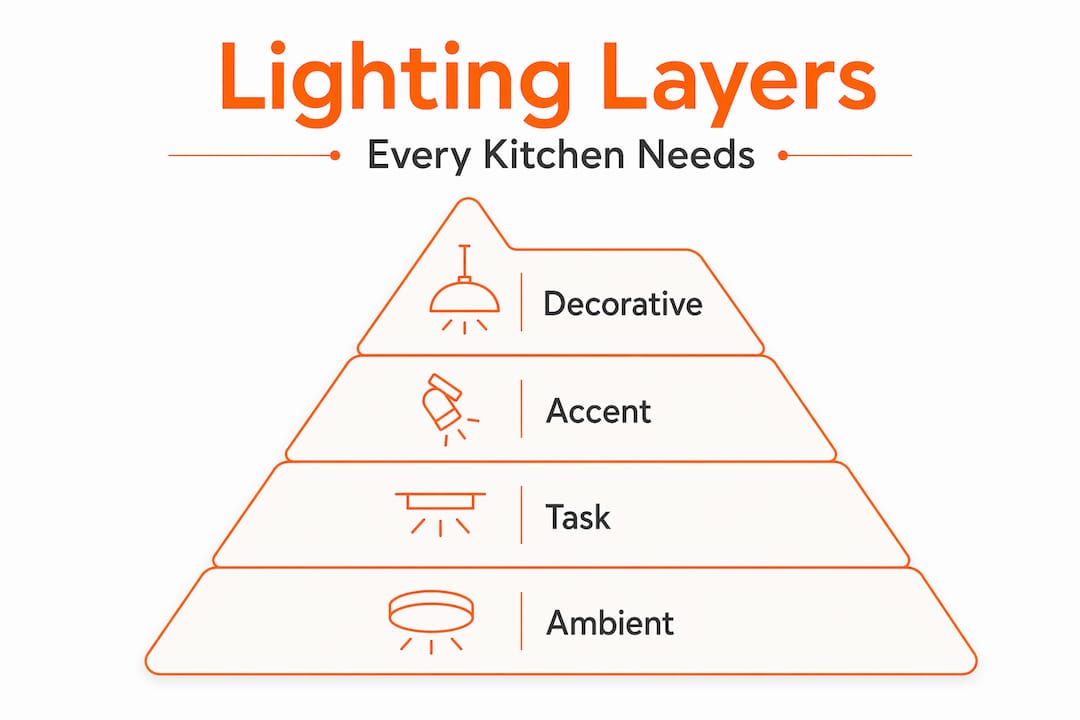
De Vier Verlichtingslagen Die Elke Keuken Nodig Heeft: Een Symfonie van Licht
Hier lopen de meeste huiseigenaren vast, denkend dat één geweldige plafondlamp alles dekt. Dat doet het absoluut niet. Effectieve keukenverlichting werkt in een prachtige, dynamische symfonie van vier verschillende lagen, elk met een cruciale rol in de algehele functionaliteit en esthetiek van de ruimte.
- Algemene Verlichting (Ambient Lighting): De Basis. Deze laag zorgt voor de basisverlichting die de hele ruimte vult, zodat je veilig en comfortabel kunt navigeren. Inbouwspots, opbouwlampen of zelfs strategisch geplaatste railverlichting vervullen meestal deze rol. Het is de algemene lichtgloed die voorkomt dat je keuken aanvoelt als een grot.
- Taakverlichting (Task Lighting): Het Werkpaard. Dit is het gerichte licht dat specifieke werkzones aanpakt: aanrechtbladen, kookeilanden, kookplaten en spoelbakken. Denk aan LED-strips onder keukenkastjes, gerichte hanglampen boven een eiland, of speciale afzuigkapverlichting. Taakverlichting is van cruciaal belang voor veiligheid en efficiëntie, zodat je messnedes precies zijn en je recepten leesbaar zonder je ogen te belasten.
- Accentverlichting (Accent Lighting): De Dramamaker. Puur gericht op visuele diepte en sfeer, trekt accentverlichting de aandacht naar architectonische details, open planken, een prachtige tegelachterwand of zelfs kunstwerken. Dit wordt vaak bereikt met LED-strips, kleine gerichte spots of inbouwverlichting in kasten. Deze laag voegt dimensie toe en benadrukt de mooie elementen van je keuken, waardoor deze meer gecureerd en verfijnd aanvoelt.
- Decoratieve Verlichting (Decorative Lighting): De Persoonlijkheid. Hier schittert de unieke stijl van je keuken! Kroonluchters, statement-hanglampen en sculpturale wandlampen behoren tot deze laag. Ze voegen karakter, visueel belang en een vleugje glamour toe. Een cruciale vuistregel is echter: decoratieve armaturen mogen *nooit* worden gebruikt om de functionele belasting alleen te dragen. Ze zijn de sieraden, niet de ruggengraat, van je verlichtingsplan.
Ontwerpers benadrukken consequent dat geen enkel type armatuur al deze behoeften dekt. Een doordachte, gelaagde aanpak is wat een keuken die er alleen goed uitziet, echt scheidt van een keuken die prachtig werkt en ongelooflijk aanvoelt, dag in dag uit.
| Verlichtingslaag | Primair Doel | Veelvoorkomend Armatuurtype | Impact op Keuken |
|---|---|---|---|
| Algemeen (Ambient) | Algemene verlichting, veiligheid | Inbouwspots, opbouwlampen, railverlichting | Algemene helderheid, voorkomt donkere plekken |
| Taak (Task) | Gericht licht voor werkzones | Onderbouwstrips, hanglampen, richtspots, afzuigkapverlichting | Vermindert oogvermoeidheid, verbetert veiligheid & precisie |
| Accent (Accent) | Visueel drama, benadrukt kenmerken | LED-strips, gerichte spots, kastverlichting | Voegt diepte toe, toont designelementen |
| Decoratief (Decorative) | Stijl, persoonlijkheid, esthetische aantrekkingskracht | Kroonluchters, sculpturale hanglampen, wandlampen | Voegt karakter, blikvangers, visueel belang toe |
Je Keukenverlichtingsplan Maken: De Blauwdruk voor Briljantie
De lumen-berekening correct krijgen is stap één. Weten *waar* je die armaturen fysiek moet plaatsen – en waarom – is waar het echte vakmanschap begint. Een goed uitgevoerd plan elimineert dode zones, verbant vervelende schaduwen en laat je keuken coherent, functioneel en uitnodigend aanvoelen, in plaats van een verzameling willekeurige lampen.
Deel Je Keuken in Zones Voordat Je Iets Anders in Zones Deelt
Vergeet je keuken te zien als één grote ruimte. Stel je in plaats daarvan voor dat het een verzameling van afzonderlijke activiteitszones is, elk met zijn eigen verlichtingsbehoeften en persoonlijkheid. Deze aanpak vereenvoudigt het planningsproces enorm:
- De Kookzone: Fornuis, kookplaat, oven. Heeft helder, gericht, schaduwvrij licht nodig voor veiligheid en precisie.
- De Voorbereidingszone: Aanrechtbladen, vaak grenzend aan de spoelbak. Vereist robuuste taakverlichting om snijden, mengen en recepten lezen gemakkelijk te maken.
- De Schoonmaakzone: Spoelbak- en vaatwasmachinegebied. Heeft helder, duidelijk licht nodig om vuil te spotten en ervoor te zorgen dat de vaat glanzend schoon is.
- De Eiland/Schiereilandzone: Vaak een multifunctionele ruimte voor voorbereiding, dineren of samenkomen. Kan profiteren van een mix van gerichte taakverlichting en decoratieve elementen.
- De Eetzone: Als je een woonkeuken hebt, vereist dit gebied zachter, meer algemeen licht voor comfortabele maaltijden.
Behandel elke zone vanaf het begin afzonderlijk, en je checklist voor keukenverlichting wordt veel intuïtiever en effectiever.
Plaatsings- en Afstandsregels Die Werkelijk Werken
Dit zijn geen suggesties; het zijn de gouden regels voor effectieve keukenverlichting. Volg deze genummerde aanpak voor het plaatsen van inbouwspots en andere belangrijke lampen:
- Afstand Algemene Inbouwspots: Deel de hoogte van je plafond door twee om je *maximale* armatuurafstand te krijgen. Bijvoorbeeld, een plafond van 2,4 meter betekent dat armaturen niet meer dan 1,2 meter uit elkaar mogen staan. Dit zorgt voor gelijkmatige algemene verlichting zonder donkere plekken.
- Inbouwspots & Wandkasten: Plaats inbouwspots 45 tot 60 centimeter van de voorkant van wandkasten. Deze cruciale plaatsing projecteert licht op het aanrecht in plaats van op de kastfronten, waardoor die frustrerende schaduwen die je voorbereidingswerk hinderen, effectief worden geëlimineerd.
- Plaatsing Hanglampen Boven Eiland: Voor optimale dekking en esthetiek, plaats eilandhanglampen 60 tot 75 centimeter uit elkaar (hart op hart). Houd ze ook 15 tot 30 centimeter van de eilanduiteinden, zodat het licht gelijkmatig wordt verdeeld zonder te clusteren of de uiteinden donker te laten.
- Onderbouwverlichting: Installeer onderbouwverlichting aan de *voorkant* van de kast, niet aan de achterkant. Plaatsing aan de voorkant duwt licht naar beneden op het werkoppervlak, waar het nodig is, in plaats van alleen de achterwand te verlichten.
- Verlichting Boven Spoelbak: Als je een raam boven je spoelbak hebt, overweeg dan een inbouwspot direct erboven, of een kleine, aantrekkelijke opbouwlamp. Dit biedt de nodige taakverlichting zonder de raamdecoratie te verstoren.
- Plan voor Zone-Specifieke Dimmers: Dit is een game-changer! Aparte bediening voor algemene, taak- en accentcircuits geeft je de ultieme flexibiliteit om te schakelen van een heldere, energieke voorbereidingsmodus naar een ontspannen, intieme diner-ambiance zonder iets opnieuw te bedraden.
Pro Tip: Gebruik bij het plannen van de plaatsing van hanglampen boven een eiland schilderstape op het plafond om de voorgestelde armatuurposities te markeren. Voor een meer meeslepende ervaring, hang ballonnen of uitgesneden papieren vormen op de beoogde hoogtes. Leef een dag of twee met de markeringen en observeer hoe natuurlijk licht gedurende de dag met die plekken interageert. Mogelijk moet je je oorspronkelijke plan aanpassen, wat je dure fouten bespaart!
Onthoud dat een enkele centrale plafondarmatuur vlak, inspiratieloos licht en harde schaduwen creëert in de hele keuken. Omarm de kracht van meerdere, individueel bedienbare lichtbronnen.
Veiligheidsoverwegingen Die Je Van Tevoren Moet Weten
Sla deze kritieke veiligheidsspecificaties op je checklist voor huisverlichting niet over:
- IC-geclassificeerde Behuizingen: Voor inbouwspots die in de buurt van isolatie worden geïnstalleerd (zoals in een zolder boven je keukenplafond), kies altijd "IC-geclassificeerde" (Insulated Contact) behuizingen. Niet-IC-geclassificeerde armaturen vereisen vrije ruimte van isolatie en kunnen brandgevaar opleveren als ze niet correct worden geïnstalleerd.
- Nat/Vochtige-Locatie Classificaties: Armaturen direct boven spoelbakken, kookplaten of andere gebieden die gevoelig zijn voor vocht moeten een "natte-locatie" of "vochtige-locatie" classificatie hebben. Dit zorgt ervoor dat ze zijn ontworpen om spatten en vochtigheid te weerstaan zonder kortsluiting te veroorzaken of een gevaar te worden.
Dit zijn geen optionele upgrades. Het overslaan ervan creëert brandrisico's, elektrische gevaren en potentiële bouwovertredingen die op het slechtst mogelijke moment kunnen opduiken tijdens huisinspecties.
Armaturen en Lampen Slim Kiezen: Stijl Ontmoet Functionaliteit
Nu komt het deel waar de meeste mensen mee willen beginnen! De keuze van armaturen is oprecht spannend, maar komt pas volledig tot zijn recht als het zorgvuldige planningswerk dat we zojuist hebben besproken, al is gedaan. Hier lees je hoe je de juiste beslissingen neemt, zodat je gekozen lampen zowel mooi als uiterst functioneel zijn.
Bundelbreedte en Lumenopbrengst Afstemmen op Elke Zone
Zie de bundelbreedte als de spreiding van licht. Het is cruciaal om licht precies daar te richten waar je het nodig hebt:
- Brede Bundel (90-120 graden): Inbouwspots voor algemene verlichting gebruiken doorgaans een brede bundelspreiding om de ruimte breed en gelijkmatig te verlichten. Dit creëert die comfortabele basislaag van verlichting.
- Smal Bundel (30-60 graden): Taakgerichte armaturen, inclusief railspots gericht op aanrechten, werken het beste met een smallere bundel. Dit concentreert licht precies waar het mes het snijvlak raakt, wat intense, gerichte verlichting biedt zonder overloop of verblinding. Het kiezen van een breedstralende armatuur voor taakverlichting is een verrassend veelvoorkomende fout die verblinding produceert zonder nuttige verlichting.
CRI Kiezen voor Werkelijke Keukenprestaties: Zie Je Eten in Ware Kleur
De Color Rendering Index (CRI) meet hoe nauwkeurig een lichtbron de ware kleur van objecten weergeeft, vergeleken met natuurlijk daglicht. Voor keukens, waar voedselpresentatie en -beoordeling cruciaal zijn, geef je prioriteit aan armaturen met een CRI van 90 of hoger. Lagere CRI-waarden (alles onder de 80) kunnen verse producten er dof uit laten zien, vlees onaantrekkelijk doen lijken en het zelfs moeilijker maken om te beoordelen of iets goed gaar is. Dit is belangrijker dan de meeste mensen beseffen, totdat ze merken dat hun levendige basilicum er ziek uitziet onder slecht licht!
- Kies lampen en armaturen met een CRI van 90 of hoger voor alle voorbereidings- en kookzones om een accurate kleurweergave van voedsel te garanderen.
- Gebruik 3000K tot 3500K voor een warme, uitnodigende sfeer die nog steeds uitstekende zichtbaarheid van voedsel ondersteunt.
- Reserveer 4000K voor moderne, minimalistische keukens waar klinische helderheid en een strakke esthetiek deel uitmaken van het ontwerp.
- Controleer de LED-dimmer compatibiliteit vóór installatie. Standaard gloeilampdimmers veroorzaken vaak LED-flikkering, gezoem of abrupt uitschakelen. Controleer altijd de LED-specificatie van de dimmer en de compatibiliteitslijst van de lampfabrikant.
Pro Tip: Controleer bij het kiezen van keukenverlichtingsopties, zoals hanglampen boven een eiland, de vermelde montagehoogte van het armatuur. De meeste hanglampen presteren het beste als ze 75 tot 90 centimeter boven het eilandoppervlak hangen. Te hoog en de gerichte straal verliest intensiteit; te laag en je creëert ongemakkelijke verblinding voor iedereen die daar zit of werkt, waardoor uitzicht en gesprekken worden belemmerd.
Het stylen van je armaturen om de esthetiek van je keuken aan te vullen is het leuke deel van het kiezen van keukenverlichting, en het zou absoluut als laatste moeten komen. Zodra je de lumenopbrengst, kleurtemperatuur, CRI en dimmercompatibiliteit hebt bevestigd, heb je de vrijheid verdiend om de afwerking, het materiaal en de vorm te kiezen die je enthousiast maakt. Je kunt verkennen hoe verlichting design vormgeeft om je armatuurkeuzes te verbinden met de bredere esthetiek van je keuken voordat je een definitieve beslissing neemt.
Slimme Verlichting en Bediening: De Toekomst is Nu
Omarm de kracht van slimme verlichting om de functionaliteit en sfeer van je keuken naar een heel nieuw niveau te tillen. Moderne technologie biedt ongelooflijke flexibiliteit:
- Slimme Dimmers & Schakelaars: Bedien je lampen via je telefoon, stemassistent of plan ze zelfs om automatisch aan/uit te gaan. Veel slimme dimmers bieden fijnere controle over de helderheidscurves van LED's.
- Instelbare Witte LED's: Sommige LED-armaturen stellen je in staat om de kleurtemperatuur aan te passen van warm (2700K) naar koel (5000K) met een veeg van een app. Stel je voor dat je schakelt van helder 4000K voor de ochtendvoorbereiding naar een gezellige 3000K voor een avonddiner!
- Bewegingssensoren: Ideaal voor voorraadkasten of onderkast-plintverlichting, bewegingssensoren kunnen handige handsfree verlichting bieden wanneer je die het meest nodig hebt.
- Integratie met Smart Home Systemen: Verbind je keukenverlichting met je bredere smart home ecosysteem voor naadloze bediening naast je thermostaat, beveiliging en entertainmentsystemen.
Hoewel het een initiële investering is, biedt slimme verlichting ongeëvenaard gemak, energiebesparing en gepersonaliseerde controle over de sfeer van je keuken. Verken slimme huisverlichtingsopties om te zien wat bij jouw levensstijl past.
Installatietips en Fouten om te Vermijden: Soepel Zeilen
Het beste lichtplan ter wereld is slechts zo goed als de uitvoering ervan. Als de installatie misgaat, zit je met frustratie, extra kosten en mogelijk een onveilige opstelling. Dit zijn de praktische lessen die tijd, geld en die gevreesde tweede reis naar de bouwmarkt besparen.
- Mock-up Hanglamp Plaatsing: Zoals eerder vermeld, hang ballonnen of plak papieren uitsparingen op de beoogde hoogtes en afstanden van je hanglampen. Deze visuele methode onthult schaalproblemen en afstandsissues die bijna onmogelijk op papier te vangen zijn. Het is een goedkope, gemakkelijke manier om te voorkomen dat je onomkeerbare gaten op de verkeerde plek boort.
- Schrijf een Gedetailleerd Lichtplan: Voordat je één enkel armatuur koopt of zelfs een elektricien belt, maak een uitgebreid schriftelijk plan met daarin de plaatsing van armaturen, bedradingsroutes, schakellocaties en zelfs specifieke lampentypes. Dit voorkomt bouwovertredingen, overbelasting van het voltage en de dure verrassingen die tijdens de installatie opduiken.
- Vertrouw Nooit op Eén Enkele Plafondarmatuur: Dit moet herhaald worden. Vlak, enkelvoudig licht produceert harde schaduwen, slecht zicht voor taken en geen aanpassingsvermogen voor verschillende activiteiten. Het is het kenmerk van een verouderde of slecht verlichte keuken.
- Controleer het Totale Wattage op Elk Circuit: Dit is een kritieke veiligheidscontrole. Overbelaste circuits vormen een reëel risico wanneer je meerdere inbouwspots of hanglampen met hoog wattage toevoegt aan een bestaand keuken circuit. Bereken altijd het totale wattage voor elk circuit dat je van plan bent te gebruiken. Raadpleeg bij twijfel een erkende elektricien voordat je verdergaat om het uitschakelen van zekeringen of zelfs elektrische branden te voorkomen.
- Vermijd Incompatibele Dimmers: Het gebruik van dimmers die geschikt zijn voor gloeilampen met LED-lampen is een van de meest voorkomende fouten bij DIY keukenverlichting installaties. Dit kan leiden tot flikkeren, zoemen, een kortere levensduur van de lamp, of zelfs volledige uitval. Controleer altijd de expliciete LED-classificatie van de dimmer en controleer, indien mogelijk, de compatibiliteitslijst van de lampfabrikant voor specifieke dimmermodellen.
- Overweeg Professionele Installatie: Hoewel sommige eenvoudige armatuurwissels zelf kunnen worden gedaan, kunnen complexe installaties met nieuwe bedrading, circuituitbreidingen of meerdere inbouwspots het beste worden overgelaten aan een erkende elektricien. Dit garandeert veiligheid, naleving van lokale codes en een professionele afwerking.
“Een schriftelijk lichtplan met armatuurplaatsing, bedradingsroutes en schakellocaties moet worden voltooid voordat er ook maar één armatuur wordt aangeschaft. Voorafgaande planning voorkomt bouwovertredingen, overbelasting van het voltage en installatieverrassingen.” — Expertprincipe voor lichtontwerp
Goede keukenverlichting ontwerptips van professionals wijzen consequent terug naar hetzelfde principe: beslissingen die op papier worden genomen, kosten niets om te herzien. Beslissingen die na het boren en bedraden worden genomen, kosten aanzienlijk meer – zowel in geld als in spijt.
Mijn Visie op Wat een Keuken Werkelijk Transformeert
Ik heb met genoeg huiseigenaren gewerkt aan
Blader door onze uitgebreide catalogus lampen met directe links om te kopen bij vertrouwde retailers.Misschien vind je deze lampen ook leuk