Kennen Sie das? Dieser Moment, in dem Sie eine brandneue Lampe auspacken, echte Aufregung aufsteigt, nur damit sie in einem „Nö“ verpufft, weil Sie merken, dass alles falsch ist. Zu hoch, zu schwach, der Schirm passt nicht zu Ihrem Lieblingssessel. Es ist eine häufige, kostspielige und frustrierende Erfahrung. Aber was wäre, wenn Sie dieses Rätselraten für immer verbannen könnten? Was wäre, wenn Sie wirklich *sehen* könnten, wie eine Lampe in Ihrem exakten Raum aussehen würde, komplett mit realistischen Lichteffekten, Schattenspiel und Farbtemperaturverschiebungen, alles bevor Sie auf „In den Warenkorb“ klicken?
Gute Nachrichten, designaffiner Freund! Diese Zukunft ist dank modernster Lampenvisualisierungstechnologie bereits hier. Es geht nicht nur darum, ein statisches Bild zu überlagern; es geht um dynamische, interaktive Simulationen, die Sie befähigen, Beleuchtungsentscheidungen mit Zuversicht zu treffen. Dieser umfassende Leitfaden führt Sie durch alles, vom Verständnis der Tools bis zur Anwendung von Experten-Beleuchtungsprinzipien, um sicherzustellen, dass Ihr nächster Lampenkauf sich wie ein Geniestreich anfühlt und nicht wie ein Schuss ins Blaue.
Lampenvisualisierung entschlüsseln: Ihre wesentlichen Tools & Vorbereitung
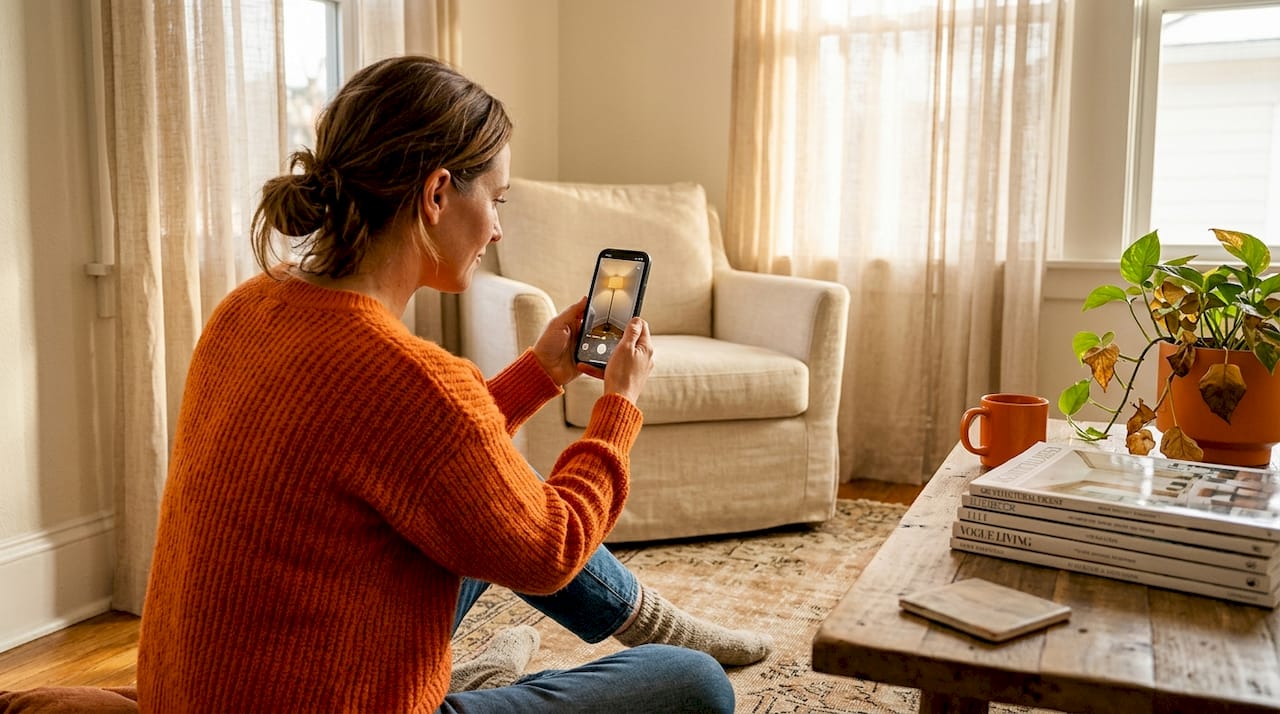
Bevor Sie virtuell Ihr Zuhause einrichten, lassen Sie uns klären, was moderne Visualisierungstools zu bieten haben. Wir sprechen hier von zwei Hauptakteuren: Augmented-Reality-Apps (AR-Apps) und KI-gestützten Plattformen. AR-Apps sind wie magische Spiegel, die 3D-digitale Lampenmodelle über Ihr Live-Kamerabild legen. Das bedeutet, Sie können buchstäblich mit Ihrem Handy in der Hand durch Ihr Zimmer gehen und eine virtuelle Pendelleuchte von Ihrer Decke oder eine Stehleuchte neben Ihrem Sofa sehen, als ob sie wirklich da wäre. Dies vermittelt ein tiefes Gefühl für Maßstab und Proportionen, das ein flaches Produktfoto einfach nicht liefern kann.
KI-Plattformen gehen noch einen Schritt weiter. Sie zeigen Ihnen nicht nur eine Lampe, sondern analysieren auch den vorhandenen Stil, das natürliche Licht, die Farbpalette und die Anordnung Ihres Zimmers, um personalisierte Empfehlungen zu generieren. Stellen Sie sich vor, Sie hätten einen digitalen Innenarchitekten, der nicht nur Lampen vorschlägt, sondern Ihnen auch hilft, diese im Kontext zu visualisieren. Viele dieser Plattformen integrieren auch AR-Funktionen und bieten so das Beste aus beiden Welten.
Das Schöne daran ist, dass AR-Apps 3D-Lampenmodelle in einer Live-Kameraansicht für Echtzeit-Positionierung und Lichtsimulation platzieren, was bedeutet, dass die Technologie tatsächlich interaktiv ist und nicht nur ein statischer Bildeditor. Was Sie sehen, verschiebt sich, wenn Sie Ihr Telefon bewegen, was Ihnen ein tiefes Gefühl für Maßstab und Proportionen vermittelt, das ein flaches Produktfoto einfach nicht liefern kann.
Checkliste zur Vor-Visualisierung: Diese Schritte nicht überspringen!
Um das Beste aus diesen Tools herauszuholen, ist ein wenig Vorbereitung Gold wert. Betrachten Sie es als das Bühnenbild für Ihr Beleuchtungs-Meisterwerk:
- Präzise messen: Schnappen Sie sich das Maßband! Die Deckenhöhe ist entscheidend für Pendel- und Stehleuchten. Wandmaße sind wichtig für Wandleuchten. Sogar die Tiefe Ihres Beistelltisches beeinflusst, wie eine Tischlampe platziert wird. Eine zu tief hängende Pendelleuchte in einem Raum mit 2,70 m Deckenhöhe wirkt erdrückend; dieselbe Leuchte in einem Raum mit 3,60 m schwebt elegant.
- Ihre Beleuchtungsbedürfnisse definieren: Jede Lampe dient einem Zweck. Möchten Sie die allgemeine Deckenbeleuchtung ergänzen, einen fokussierten Arbeitsbereich zum Lesen oder Arbeiten schaffen oder dramatische Akzentbeleuchtung hinzufügen, um Kunstwerke oder architektonische Merkmale hervorzuheben? Wenn Sie dies wissen, können Sie klären, welche Lampentypen (und wo) Sie visualisieren sollten. Unsere Übersicht zu Beleuchtung für verschiedene Einrichtungsstile ist in dieser Phase eine nützliche Referenz.
- Gerätekompatibilität prüfen: Die meisten AR-Apps sind anspruchsvoll. Sie benötigen moderne Betriebssysteme wie ARKit (iOS 11+) oder ARCore (Android 8.0+), um optimal zu funktionieren. Ältere Geräte könnten Schwierigkeiten mit der genauen Oberflächenerkennung haben, was dazu führt, dass Lampen in der Luft schweben oder durch den Boden sinken.
- Bestehende Beleuchtung beachten: Welche Glühbirnen haben Sie bereits? Sind sie dimmbar? Wenn Sie Ihr aktuelles Setup (einschließlich natürlicher Lichtquellen) kennen, können Sie besser visualisieren, wie eine neue Lampe integriert wird und welche Art von Glühbirne Sie dafür benötigen. Die Visualisierung einer neuen Leuchte neben nicht-dimmbaren Quellen kann zu einer Diskrepanz führen, die Ihnen keine App anzeigen wird.
Ein kurzer Blick auf beliebte Visualisierungstools:
Jedes Tool hat seine eigene Persönlichkeit und Stärken:
| Tool/Kategorie | Kataloggröße | Lichtsimulation | Markenübergreifende Unterstützung | AR-Genauigkeit |
|---|---|---|---|---|
| IKEA Place | Groß (nur IKEA) | Grundlegendes Leuchten, Skala | Nein | Hoch |
| Houzz "View in My Room" | Sehr groß (nur Houzz) | Farbfilter, Skala | Begrenzt | Hoch |
| DecorViz (oder ähnliche KI-/AR-Plattformen) | Breit (markenübergreifend) | Schatten, Lux, Farbtemperatur | Ja | Mittel-Hoch |
| BEGA AR+ (Profi-Qualität) | Spezialisiert (BEGA) | Professionelles Lux, Ausstrahlwinkel | Nein | Sehr hoch |
IKEA Place ist fantastisch für zugängliche, alltägliche Lampen und bietet eine bemerkenswert zuverlässige Oberflächenverfolgung. Houzz ist hervorragend zum Stöbern in einem riesigen Marktplatz. Plattformen wie DecorViz sind Ihre beste Wahl für Flexibilität, da Sie Stile verschiedener Marken vergleichen können. Und wenn Sie ein echter Beleuchtungsenthusiast oder Profi sind, bieten Tools wie BEGA AR+ architektonische Präzision und simulieren tatsächliche Lux-Werte (ein Maß für die Lichtintensität pro Quadratmeter), bevor Sie sich festlegen.
Schritt für Schritt: AR- & KI-Lampenvisualisierung meistern
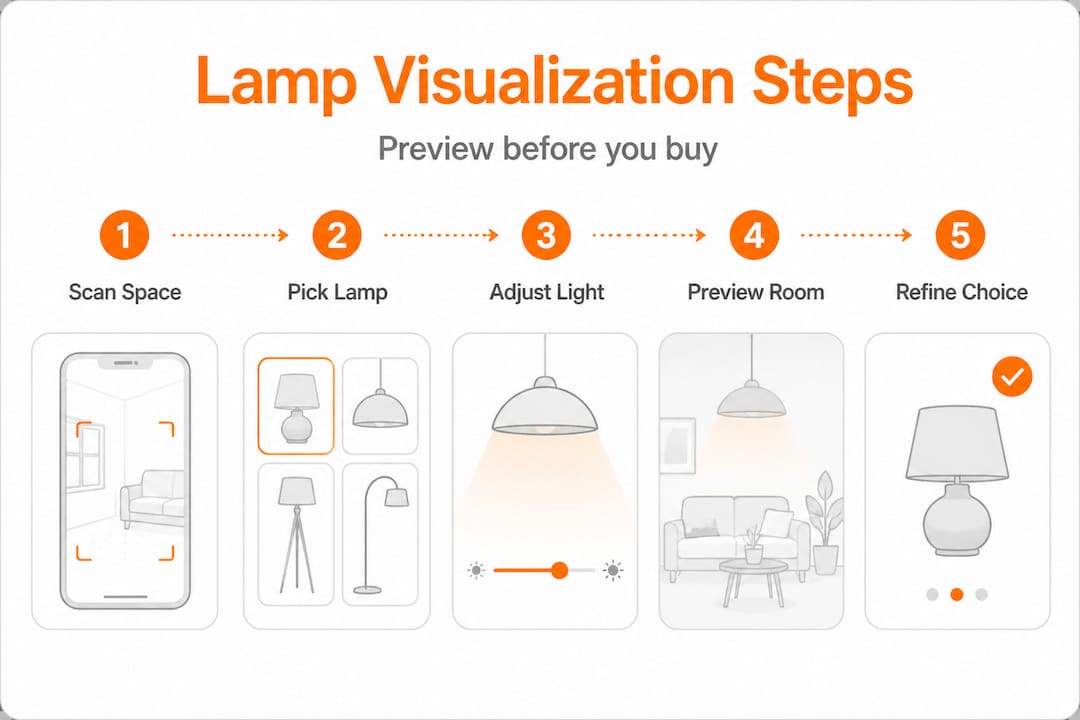
Mit Ihrem vorbereiteten Raum und Ihrer heruntergeladenen App ist es Showtime! Befolgen Sie diese Schritte, um die realistischsten und nützlichsten Visualisierungsergebnisse zu erzielen:
-
Scannen Sie Ihren Raum systematisch: Öffnen Sie Ihre ausgewählte AR-App und beginnen Sie mit dem Scannen. Bewegen Sie Ihr Telefon langsam und gleichmäßig und erstellen Sie überlappende Bögen über Ihren Boden, Wände und Decke. Die meisten AR-Tools benötigen 15 bis 30 Sekunden, um eine genaue 3D-Raumkarte Ihres Zimmers zu erstellen. Widerstehen Sie dem Drang, dies zu überstürzen! Ein hastiger Scan führt oft zu falsch ausgerichteten Lampenplatzierungen, bei denen Modelle zu schweben oder durch Oberflächen zu sinken scheinen.
-
Durchsuchen, Importieren und Positionieren: Jetzt kommt der spaßige Teil! Wählen Sie eine Leuchte aus dem Katalog der App aus. Wenn Ihre Plattform dies unterstützt, können Sie sogar ein Produktbild einer Lampe, die Sie lieben, hochladen und die KI-visuelle Suche nutzen, um ein ähnliches Modell innerhalb der App zu finden. Ziehen Sie die virtuelle Lampe vorsichtig per Drag & Drop an die von Ihnen vorgesehene Stelle. Treten Sie zurück und beobachten Sie die Gesamtkomposition – fühlt sie sich ausgewogen an?
-
Licht simulieren: Helligkeit & Farbtemperatur: Hier glänzt die moderne Visualisierung wirklich. Die besten Tools ermöglichen es Ihnen, Helligkeitsstufen umzuschalten und so einen Einblick zu erhalten, wie die Lampe Ihren Raum beleuchten wird. Noch wichtiger ist, dass sie es Ihnen ermöglichen, die Farbtemperatur zu verschieben, normalerweise zwischen warm (ca. 2700K-3000K für gemütliche Bernsteintöne) und neutral (3500K für klares, helles Licht). Das ist wichtig, da AR-Apps Lichteffekte neben der Positionierung simulieren und Ihnen so eine Vorschau auf die tatsächliche Atmosphäre geben, nicht nur auf die Silhouette der Leuchte.
-
Höhe und Ausrichtung bewusst anpassen: Akzeptieren Sie nicht einfach die Standardplatzierung. Eine leicht geneigte Stehleuchte kann einen dramatischen Wand-Wash-Effekt erzeugen, während eine gerade nach oben gerichtete Lampe eine allgemeinere Beleuchtung bietet. Eine Tischlampe, virtuell auf einem Stapel Bücher „erhöht“, könnte plötzlich ein geschätztes Kunstwerk an der Wand beleuchten, das sie sonst übersehen würde. Experimentieren Sie hier frei – selbst subtile Anpassungen können die Wirkung einer Lampe dramatisch verändern.
-
Screenshots aus mehreren Blickwinkeln aufnehmen: Ihre Perspektive zählt! Was aus Ihrer stehenden Position perfekt aussieht, könnte einen ungünstigen Schatten werfen oder von Ihrem Lieblingssessel aus überwältigend wirken. Bewegen Sie sich zu Türen, Sitzpositionen und Eingangsbereichen und machen Sie Screenshots aus jedem Winkel. Diese Seiten-an-Seiten-Vergleiche sind von unschätzbarem Wert für die Bewertung von Optionen.
-
Mit Ihrem Schichtbeleuchtungsplan abgleichen: Bevor Sie eine endgültige Entscheidung treffen, konsultieren Sie immer Ihre umfassendere Schichtbeleuchtungsstrategie. Füllt diese neue Lampe eine echte Lücke (Ambient, Task oder Akzent) oder ist sie redundant? Jede Lampe sollte sinnvoll zur Gesamtbeleuchtung des Raumes beitragen. Vergessen Sie nicht, die Wahl der Lampenbirnen zu berücksichtigen, bevor Sie eine Visualisierung abschließen. Die Lumenleistung und der Abstrahlwinkel der Birne beeinflussen direkt, wie viel Ihrer Simulation in der realen Welt umgesetzt wird.
Profi-Tipp: Wenn Sie eine Tisch- oder Stehleuchte visualisieren, halten Sie Ihr Telefon physisch auf der projizierten Schirmhöhe der Lampe und schwenken Sie langsam durch den Raum. Dies ahmt die tatsächliche Lichtverteilung viel genauer nach, als wenn Sie das Modell aus Ihrer stehenden Augenhöhe betrachten.
Experten-Beleuchtungsprinzipien für realistische Visualisierung
Eine visuell genaue Platzierung ist der erste Schritt. Aber die Anwendung von Experten-Beleuchtungsprinzipien ist das, was diese Platzierung *richtig anfühlen* lässt, sobald die echte Lampe installiert ist. Hier stolpern viele Hausbesitzer, die sich rein auf Apps verlassen: Sie treffen die Ästhetik, verpassen aber die Beleuchtungswissenschaft.
Die Kraft der Schichtbeleuchtung
Das grundlegende Prinzip im professionellen Innenbeleuchtungsdesign ist die Schichtbeleuchtung. Das bedeutet, verschiedene Arten von Lichtquellen zu kombinieren, um einen vielseitigen, komfortablen und optisch ansprechenden Raum zu schaffen. Es gibt drei Hauptschichten:
- Ambient-Beleuchtung: Dies ist Ihre allgemeine, umfassende Beleuchtung – das Grundlicht, das den Raum füllt. Denken Sie an Deckenleuchten, Einbauleuchten oder große Stehleuchten, die Licht von der Decke abprallen lassen. Stellen Sie in Ihrer Visualisierung sicher, dass die Ambient-Schicht ein angenehmes Grundniveau an Licht bietet, ohne grell zu sein.
- Aufgabenbeleuchtung: Fokussiertes Licht für bestimmte Aktivitäten. Eine Schreibtischlampe zum Lesen, Unterschrankbeleuchtung zum Kochen oder eine Pendelleuchte über einem Esstisch. Berücksichtigen Sie bei der Visualisierung die Aktivität in diesem Bereich und stellen Sie sicher, dass die Lampe ausreichend, blendfreies Licht dort liefert, wo es benötigt wird.
- Akzentbeleuchtung: Diese Schicht verleiht Dramatik und hebt bestimmte Merkmale wie Kunstwerke, architektonische Details oder Pflanzen hervor. Stellen Sie sich Strahler, Bilderleuchten oder kleine gerichtete Lampen vor. Nutzen Sie die Visualisierung, um zu sehen, wie Schatten geworfen werden und wie bestimmte Elemente zum Leben erweckt werden.
Der Industriestandard sieht mindestens zwei Lichtquellen pro Raum vor, und typischerweise drei oder mehr für Räume, die morgens, nachmittags und abends genutzt werden. Diese Flexibilität ermöglicht es Ihnen, die Stimmung und Funktionalität Ihres Raumes den ganzen Tag über anzupassen.
„Schichtbeleuchtung mit zwei bis drei Quellen pro Raum ist der Standardansatz, und dimmbares warmes bis neutralweißes Licht von 2700-3500K ist der bevorzugte Bereich für den Wohnkomfort.“
Die Kunst der Farbtemperatur (Kelvin-Skala)
Die Farbtemperatur wird oft übersehen, beeinflusst aber die Stimmung eines Raumes tiefgreifend. Gemessen in Kelvin (K) beschreibt sie die wahrgenommene Wärme oder Kühle von weißem Licht. Apps, die es Ihnen ermöglichen, die simulierte Farbtemperatur anzupassen, sind unglaublich wertvoll, denn gelbliches warmes Licht und klares neutrales Licht verwandeln denselben Raum in zwei völlig unterschiedliche Stimmungen.
| Farbtemperatur | Kelvin-Bereich | Wahrgenommener Effekt | Am besten für | Visualisierungs-Tipp |
|---|---|---|---|---|
| Warmweiß | 2700K - 3000K | Gemütlich, einladend, sanftes Leuchten | Schlafzimmer, Wohnzimmer, Essbereiche | Bei Dämmerung simulieren, um den wahren warmen, entspannenden Effekt zu sehen. |
| Neutralweiß | 3000K - 3500K | Klar, hell, energiegeladen | Küchen, Home Offices, Badezimmer | Mit Wandfarbuntertönen abgleichen; vermeidet Vergilben oder Härte. |
| Kaltweiß / Tageslicht | 4000K - 5000K+ | Hell, klar, stimulierend | Garagen, Wirtschaftsräume, aufgabenintensive Bereiche | Kann warm getönte Einrichtungsgegenstände auswaschen; sparsam in Wohnräumen verwenden. |
Für die meisten Wohnräume ist ein Bereich von 2700K-3500K ideal. Dieser Bereich bietet Komfort, ohne an Klarheit einzubüßen. Detailliertere Informationen zur Lichtfarbtemperatur finden Sie bei Quellen wie der Illuminating Engineering Society (IES).

Lux-Werte verstehen (und warum sie wichtig sind)
Lux-Werte messen die Intensität des Lichts, das auf eine Oberfläche trifft. Während Verbraucher-Apps nicht immer Echtzeit-Lux anzeigen, hilft das Verständnis des Konzepts, Ihre Visualisierungen zu interpretieren. Ein Lesebereich benötigt etwa 300 bis 500 Lux an der Oberfläche des Buches für komfortables Lesen. Ein Esstisch sieht am besten bei 150 bis 300 Lux für eine intime Atmosphäre aus. Wenn Ihre App keine Lux anzeigt, denken Sie über den *Zweck* des Lichts nach und schätzen Sie mental ab, ob die simulierte Helligkeit ausreichend erscheint.
Häufige Visualisierungsfehler, die Sie vermeiden sollten:
- Unterbeleuchtete Ecken: Unbeleuchtete Ecken lassen einen Raum kleiner und ungemütlicher wirken. Überprüfen Sie immer die Helligkeit aller Ecken in Ihren Screenshots.
- Farbtemperatur-Konflikte: Das Mischen einer 2700K-Lampe neben einer 4000K-Deckenleuchte erzeugt eine visuelle Dissonanz, die Ihr Auge als „irgendetwas stimmt nicht“ registrieren wird. Streben Sie Konsistenz innerhalb eines einzelnen Raumes an.
- Übergroße Pendelleuchten: Der Maßstab ist auf dem Bildschirm notorisch schwer zu beurteilen. Überprüfen Sie immer die Abmessungen der Leuchte im Vergleich zu Ihrer tatsächlichen Deckenhöhe und den Möbeln darunter. Eine gute Faustregel für Esstisch-Pendelleuchten ist, dass der Durchmesser etwa die Hälfte der Tischbreite betragen sollte.
- Den „Aus“-Zustand ignorieren: Visualisieren Sie die Lampe auch bei ausgeschaltetem Licht. Ein schöner Schirm könnte im unbeleuchteten Zustand zu einer hässlichen Silhouette werden oder eine Sicht blockieren und so die Tagesästhetik des Raumes untergraben.
Das Durchsuchen von modernen dimmbaren Stehleuchten zusammen mit Ihren simulierten Layouts ist eine kluge Methode, um Leuchten zu identifizieren, die die Flexibilität bieten, im Laufe des Tages zwischen Ambient- und Akzentrollen zu wechseln. Und greifen Sie immer auf Ihren umfassenderen Schichtbeleuchtungsleitfaden zurück, um zu bestätigen, dass jede Visualisierung das gesamte Beleuchtungssystem des Raumes unterstützt.
Fehlerbehebung & Optimierung Ihrer virtuellen Lampenauswahl
Selbst mit den besten Tools und Prinzipien werfen Visualisierungen manchmal eine unerwartete Herausforderung auf. Die Lampe sieht in der App perfekt aus, aber etwas fühlt sich immer noch seltsam an. Oder Sie finden das genaue Modell, das Sie möchten, in keinem AR-Katalog. Diese Reibungspunkte sind häufig, und es gibt klare Strategien, um damit umzugehen.
Häufige Visualisierungshürden überwinden:
- Ausrichtungsfehler (schwebende/sinkende Lampen): Dies ist fast immer auf eine schlechte Oberflächenerkennung zurückzuführen. Scannen Sie den Boden und die umgebenden Oberflächen langsam und gründlich erneut, bevor Sie das Modell platzieren. Helles, ungleichmäßiges Umgebungslicht oder stark gemusterte Teppiche können AR-Tracking-Algorithmen manchmal verwirren. Versuchen Sie, die Beleuchtung Ihres Zimmers anzupassen oder die Möbel leicht zu verschieben, wenn das Problem weiterhin besteht.
- Farbwiedergabe-Diskrepanzen: AR-Simulationen nähern die Lichtfarbe an, können aber nicht die volle spektrale Ausgabe einer echten Glühbirne replizieren. Wenn Ihre Visualisierung wärmer als erwartet aussieht, stellen Sie sich im realen Leben eine Stufe kühler vor (z. B. wenn 3000K zu gelb aussieht, streben Sie eine reale 3500K-Glühbirne an).
- Maßstabsverwirrung: Digitale Bildschirme können die Wahrnehmung verzerren. Platzieren Sie ein reales Objekt, dessen Abmessungen Sie kennen (einen Standardstuhl, ein Sofa, einen Couchtisch), im Bild neben der virtuellen Lampe. Der Vergleich von Proportionen mit einer bekannten Größe hilft, Ihre Wahrnehmung schnell zu kalibrieren. Ein weiterer Trick: Schneiden Sie eine Kartonschablone des Lampenfußes und des Schirmdurchmessers aus, um sie als physische Referenz im Raum zu platzieren.
- Kataloglücken: AR-Apps von Einzelhändlern beschränken Sie auf deren eigenes Sortiment. Wenn Ihre Traumlampe nicht verfügbar ist, verzweifeln Sie nicht! Verwenden Sie ein KI-basiertes visuelles Suchwerkzeug (wie das von Find a Lamp), um ein Foto Ihrer bevorzugten Lampe hochzuladen und die besten Übereinstimmungen in breiteren, markenübergreifenden Katalogen zu finden. Universelle KI-Tools wie DecorViz ermöglichen den markenübergreifenden Einkauf und sind daher für Hausbesitzer mit spezifischen ästhetischen Zielen weitaus nützlicher.
Profi-Tipp: Bestätigen Sie jede Lampenauswahl vor dem Kauf in mindestens zwei verschiedenen Apps oder Plattformen. Wenn die Leuchte sowohl in IKEA Place als auch in einem KI-gestützten Visualisierungstool überzeugend aussieht, sollte Ihr Vertrauen erheblich höher sein, als sich auf eine einzige Simulation zu verlassen. Verschiedene Rendering-Engines fangen unterschiedliche potenzielle Probleme auf.
Das Durchsuchen von dimmbaren Stehleuchten, die speziell für Wohnräume optimiert sind, oder das Überprüfen von verspielten Wohnzimmerbeleuchtungskollektionen kann Optionen aufzeigen, die Sie bei einer Standard-Stichwortsuche vielleicht nie gefunden hätten, was die zufällige Entdeckung wieder in den Prozess bringt.
Wann man Profis hinzuziehen sollte:
Obwohl Visualisierungstools leistungsstark sind, ersetzen sie in jedem Szenario keinen professionellen Lichtdesigner. Ziehen Sie einen Experten hinzu, wenn:
- Sie es mit komplexen architektonischen Merkmalen wie Gewölbedecken, aufwendigen Einbaunischen oder langen Galeriegängen zu tun haben, die eine spezielle Beleuchtung erfordern.
- Sie eine größere Renovierung durchführen, die das Neuverkabeln oder Installieren neuer Stromkästen beinhaltet.
- Sie Ihre Visualisierungsergebnisse einfach nicht mit dem in Einklang bringen können, was Sie beim Testen im Raum erleben, und Sie ein erfahrenes Auge zur Fehlerbehebung benötigen.
- Sie ein wirklich maßgeschneidertes Beleuchtungskonzept wünschen, das über Standardlösungen hinausgeht.
Ein zertifizierter Lichtdesigner kann Ihnen erhebliche Zeit, Geld und Kopfschmerzen ersparen, indem er Sicherheit, Funktionalität und ästhetische Brillanz gewährleistet.
Was die meisten Hausbesitzer bei der Lampenvisualisierung übersehen
Hier ist unsere ehrliche, etwas gegensätzliche Meinung: Die Visualisierungstechnologie ist außergewöhnlich, aber Hausbesitzer, die wirklich transformative Beleuchtungsergebnisse erzielen, behandeln sie als Ausgangspunkt und nicht als endgültiges Urteil.
Wir haben ein Muster beobachtet. Ein Hausbesitzer führt eine fehlerfreie AR-Simulation durch, bestellt die Lampe mit vollem Vertrauen, installiert sie und hat dann sofort das Gefühl, dass etwas nicht ganz stimmt. Nicht weil das Tool gelogen hat, sondern weil Bildschirme nicht vollständig simulieren können, wie Licht mit Ihrer spezifischen Wandtextur, den subtilen Untertönen Ihres Holzbodens oder der Art und Weise, wie die Nachmittagssonne um 16 Uhr in dieses bestimmte Westfenster fällt, interagiert. Digitales Licht ist annähernd. Echtes Licht ist lebendig.
Die am schönsten beleuchteten Häuser, die wir gesehen haben, wurden von Menschen entworfen, die bereit waren, Lampen nach der Installation zu verschieben, Glühbirnen mit unterschiedlichen Wattstärken und Farbtemperaturen auszuprobieren, Schirme auszutauschen oder Leuchten unerwartet zu positionieren. Die Visualisierung engt Ihr Kandidatenfeld brillant ein. Sie bewahrt Sie vor offensichtlichen Katastrophen und hilft Ihnen, den richtigen *Typ* von Lampe zu wählen. Aber die letzten 20 % der Beleuchtungsmagie kommen vom taktilen, realen Experimentieren, das keine App vollständig replizieren kann.
Persönlicher Geschmack und kreatives Risiko zählen auch mehr als „korrekte“ Platzierungen. Jede Beleuchtungsformel existiert, um bewusst gebrochen zu werden. Eine Lampe, die zu nah an einer Wand positioniert ist, um einen dramatischen Wash-Effekt zu erzeugen, eine Pendelleuchte, die tiefer hängt, als es die Konvention vorschlägt, um Intimität um einen Tisch zu schaffen: Diese Entscheidungen mögen in der Visualisierung alarmierend und in der Realität außergewöhnlich aussehen. Vertrauen Sie den Daten, dann vertrauen Sie Ihren Instinkten. Weitere Informationen darüber, wie Sie Ihre Persönlichkeit einbringen können, finden Sie in diesem Leitfaden von Studio McGee zum Brechen von Designregeln.
Die nützlichste Denkweise ist, Ihre AR-Simulation als eine vertrauenswürdige engere Auswahl zu betrachten. Lassen Sie sie die offensichtlichen Fehlpaarungen eliminieren, damit Ihre realen Tests fokussiert und effizient sind. Erkunden Sie Beleuchtung für Ihren Stil, um Inspiration zu finden, die über das Vorhersehbare hinausgeht, denn Beleuchtung, die Ihrem persönlichen Geschmack entspricht, wird immer länger Bestand haben als Beleuchtung, die einfach nur nach Zahlen „korrekt“ war.
Personalisieren Sie Ihre Beleuchtung mit Find a Lamp
Lampenvisualisierung ist eine Kunstform, die von immer intelligenterer Technologie angetrieben wird, und Sie sollten sie nicht alleine navigieren müssen.
Find a Lamp vereint KI-gesteuerte Lampenempfehlungen und visuelle Suche auf einer intuitiven Plattform. Laden Sie ein Foto Ihres Zimmers hoch und erhalten Sie kuratierte Lampenvorschläge, die auf Ihren bestehenden Stil, Ihr natürliches Licht und Ihr Layout abgestimmt sind. Durchsuchen Sie raumspezifische Kollektionen wie verspielte Wohnzimmerbeleuchtung für Räume voller Persönlichkeit oder industrielle Wohnzimmerbeleuchtung für einen architektonischeren Touch. Mit der direkt in das Browser-Erlebnis integrierten virtuellen Visualisierung können Sie von der Inspiration zum sicheren Kauf übergehen, ohne das Rätselraten, das den Lampenkauf traditionell so frustrierend macht. Ihre perfekte Beleuchtungslösung ist näher, als Sie denken.
Häufig gestellte Fragen
Was ist die beste AR-App zur Lampenvisualisierung?
IKEA Place und Houzz sind beliebte Ausgangspunkte, aber universelle Tools wie DecorViz (oder ähnliche KI-gestützte Plattformen) bieten breitere markenübergreifende Kataloge und fortgeschrittenere Lichtsimulationsfunktionen, die Händler-spezifische Apps einfach nicht erreichen können. Für professionelle Präz