Shedding Light on Success: Your Ultimate Guide to a Productive Office Lighting Workflow

Ever feel like your workspace is silently conspiring against your productivity? That nagging headache by 3 p.m., the squinting at your screen, or the general feeling of "ugh" when you sit down to work? Chances are, your lighting is a major culprit. Poor office lighting isn't just a minor inconvenience; it's a quiet saboteur of focus, energy, and overall well-being. Glare bouncing off your monitor, dim corners that strain your eyes, or that harsh, uninviting fluorescent hum – these aren't just annoyances. They accumulate into fatigue, errors, and a workspace that literally works against you.
But here's the brilliant news: transforming your lighting environment doesn't require a gut renovation or a massive budget. It requires a structured, intelligent workflow. Think of it as a strategic playbook for illumination. This isn't about buying the fanciest new lamp (though we love those!). It's about a methodical approach: assess, plan, execute, and verify. That's exactly what we're going to walk you through today – a comprehensive, step-by-step guide to elevate your workspace from dimly lit drain to brightly lit beacon of productivity. Let's get lit!
Table of Contents
- What You Need Before You Start: Assessing Your Office Lighting Baseline
- Step-by-Step Workflow: From Planning to Fixture Selection
- Managing Glare, Workstation Layout, and User Control
- Bringing in Daylight: Automating, Harvesting, and Verifying
- Why Most Office Lighting Workflows Fall Short (and What Really Matters)
- Upgrade Your Workspace Lighting The Smart Way
- Frequently Asked Questions
Key Takeaways
| Point | Details |
|---|---|
| Assess your baseline | Start with a thorough space audit and custom goals for each area to lay the foundation for an effective lighting plan. Don't skip this! |
| Follow a workflow | Adopt a step-by-step process covering assessment, layered design, and fixture choice for reliable, adaptable results. It's a journey, not a single purchase. |
| Prevent glare and improve control | Carefully place workstations and luminaires, plus add personal lighting controls to minimize discomfort and boost comfort. Empower your eyes! |
| Automate and verify | Use automated daylight and occupancy controls, but always test regularly to ensure they actually work as needed. Set it and forget it... almost. |
| Think beyond fixtures | True lighting quality is driven by layout, user control, and ongoing verification, not just product specs or purchases. Your space is dynamic! |
What You Need Before You Start: Assessing Your Office Lighting Baseline
Before touching a single fixture or ordering a single bulb, you need an honest, forensic picture of where your workspace stands right now. This is the stage most people skip entirely, and it's precisely why so many lighting upgrades disappoint. A home office lighting assessment isn't just a preliminary formality – it's the bedrock that makes every downstream decision sharper and more effective. Without it, you're just guessing, and in lighting, guessing often leads to more glare, not less.
An effective approach, as lighting professionals consistently affirm, begins with defining goals and usage per area before evaluating the space. This means factoring in daylight availability, ceiling height, and surface reflectance, and *then* selecting your lighting layers. That sequence matters enormously. Skipping to fixture selection without this crucial context is like prescribing glasses before an eye exam – you might get something, but it's unlikely to be the perfect fit.
Here's what your initial audit should cover in detail:
- Natural Light Sources: The Sun's Role. Where do windows sit relative to workstations? Does direct sunlight create blinding glare on screens at specific times of day? Are there any obstructions outside the window? Note the cardinal direction of each window – north-facing windows provide consistent, soft light, while south-facing ones bring intense, direct sunlight.
- Artificial Light Inventory: What's Already There? What types of fixtures are currently installed (e.g., outdated fluorescent tubes, modern LED panels, recessed downlights, pendant lights, desk lamps)? Note their positions, beam angles (how wide the light spreads), and overall condition (are they flickering, buzzing, or just old?). Identify the wattage and bulb type if possible.
- Problem Zones: The Dark & Dazzling. This is where you play detective. Identify perpetually dark corners, areas with flickering lights, and especially surfaces where glare is visible on screens (both direct glare from fixtures and reflected glare from surfaces). Don't forget transition zones like hallways or entryways that might be too bright or too dim.
- Color Temperature Inconsistencies: The Mood Killer. Mixing cool, blue-white light sources (like 5000K LEDs) with warm, orange-white ones (like 2700K incandescent-style bulbs) in the same space creates visual discomfort without most people ever realizing why. It can make a room feel disjointed and unsettling. Look for these clashes.
- Ceiling Height and Surface Reflectance: The Unsung Heroes. High ceilings absorb more light, requiring more powerful fixtures or more strategic placement. Dark walls, floors, and furniture reflect less light, effectively 'eating' the light output and making the room feel dimmer. Conversely, light-colored surfaces can help bounce light around, brightening a space.
Illuminance Targets by Area: How Bright is Just Right?
Illuminance – measured in lux (lumens per square meter) or foot-candles (lumens per square foot) – is your primary performance metric. Setting area-specific goals, rather than applying a single number across the entire office, is the professional standard. As one leading source notes, benchmark targets vary by task type, so office managers should set illuminance goals area by area rather than relying on a single lux figure. Different tasks demand different levels of light for optimal performance and comfort.
| Area | Minimum lux (compliance) | Recommended lux (productivity) |
|---|---|---|
| General office space | 300 lux | 400 lux (for ambient comfort) |
| Task/desk work | 300 lux | 500 lux (for detailed visual tasks) |
| Meeting rooms | 300 lux | 400 lux (adjustable for presentations vs. collaboration) |
| Break rooms | 150 lux | 200 lux (for relaxation and casual interaction) |
| Corridors/circulation | 100 lux | 150 lux (for safe movement) |
Pro Tip: Want to measure your current lux levels? Download a free lux meter app on your smartphone and take readings at noon (with full daylight, all lights on) and again after sunset (artificial light only, all lights on). This two-snapshot method immediately reveals which zones are heavily dependent on daylight and which are underperforming after dark, providing tangible data for your planning.
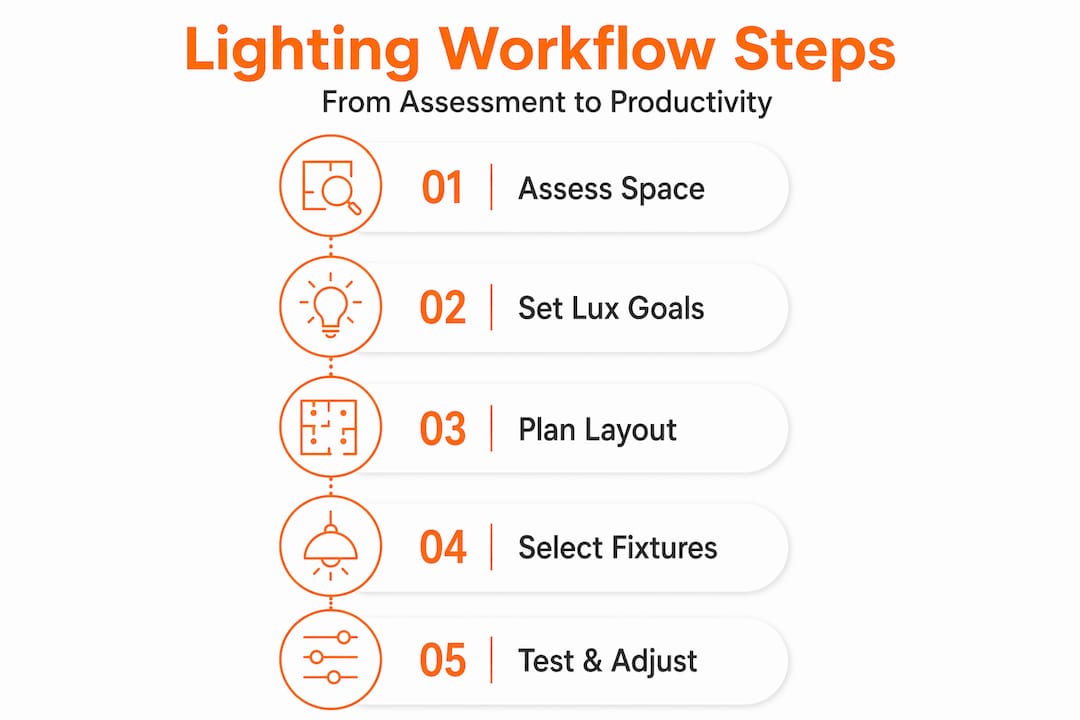
Step-by-Step Workflow: From Planning to Fixture Selection
With a clear, data-driven assessment complete, you're ready to move through the exact workflow that professional lighting designers use on every project. This isn't guesswork – it's a repeatable, reliable sequence designed for optimal results. Think of your workspace lighting optimization as a design project with distinct phases, each one building logically on the last. Skipping a step is like trying to build a house without a foundation.
The professional methodology follows a structured lighting design sequence: consultation, architectural and environment analysis, concept development through layering, technical planning including lux calculation, fixture specification, installation coordination, and final aiming, brightness refinement, and scene programming. Here's how that translates into practical, actionable steps for office managers and remote workers alike:
-
Define Area-Specific Goals (The "Why"). Before you even think about *what* light, consider *why* you need it. What is each space optimized for? A video call booth needs different lighting (soft, front-facing, glare-free) than a drafting table (bright, even, high-CRI task lighting) or a collaborative lounge area (flexible, warmer tones). Productivity spaces generally benefit from brighter, cooler light (4000K to 5000K CCT) to enhance alertness, while relaxation or break areas benefit from warmer, softer tones (2700K to 3000K) to promote comfort.
-
Conduct Architectural and Daylight Analysis (The "Where"). This builds on your baseline assessment. Walk the space at different times of day, observing how light (both natural and artificial) interacts with the architecture. Note where sunlight enters, where shadows naturally fall, and how the building's structure channels or blocks natural light. This directly informs where you place supplemental fixtures and how you manage blinds or shades. Consider seasonal changes in sun path.
-
Develop Your Layered Lighting Concept (The "How"). Layered lighting (ambient, task, and accent) is the professional standard for office environments and is repeatedly cited as the practical foundation of effective workspace design. It offers flexibility and depth.
- Ambient Light: The general illumination that fills the room, preventing harsh contrasts. Think recessed lighting, ceiling panels, or indirect uplighting.
- Task Lighting: Focused light directed at specific work surfaces, crucial for reducing eye strain. This is your desk lamp, under-cabinet lighting, or adjustable floor lamp.
- Accent Lighting: Adds depth, visual interest, and highlights architectural features or artwork. Wall sconces, track lighting, or picture lights fall into this category.
-
Calculate Lux Levels (The "How Much"). Now for the numbers! Use free online lux calculators or, for larger projects, professional lighting software to estimate how many fixtures you need, at what wattage and lumen output, to hit your target illuminance for each zone. This step is critical for preventing both over-lighting (which leads to glare and discomfort) and under-lighting (which causes strain and fatigue).
-
Specify Fixtures by CRI and CCT (The "What Kind"). This is where the technical details come into play.
- Color Rendering Index (CRI): Measures how accurately a light source renders colors compared to natural sunlight. For detailed work, graphic design, or any task where color accuracy is important, a CRI of 90 or above is ideal. Lower CRI can make colors appear dull or distorted.
- Color Correlated Temperature (CCT): Measured in Kelvin (K), CCT drives the psychological tone of the space. As mentioned, choose deliberately: 4000K-5000K for alert, focused work; 2700K-3000K for relaxed, warm environments. Avoid mixing drastically different CCTs in the same visual field.
-
Coordinate Installation (The "Making it Happen"). Plan the precise placement of fixtures before ordering or installing. Consider practicalities: cable management, compatibility with ceiling grids, mounting hardware, and access for maintenance. A fixture that is technically perfect but positioned poorly will still create glare, shadows, or dead zones. Ensure electrical capacity is sufficient and that dimmers are compatible with your chosen LED fixtures.
-
Adjust and Refine After Installation (The "Finishing Touch"). Installation isn't the end; it's the beginning of optimization. Aim directional fixtures precisely where light is needed. Program dimming scenes for different activities (e.g., "focus mode," "presentation mode," "break time"). Do a live walk-through at multiple times of day and under various conditions (e.g., sunny, overcast) to ensure the system performs as intended before calling the project complete. Gather feedback from users.
Fixture Comparison: Key Specification Criteria
When you're ready to select actual lamps and fixtures, these are the critical numbers to look for:
| Specification | Why it matters | Ideal office range |
|---|---|---|
| CRI (Color Rendering Index) | Accuracy of color rendering; higher numbers mean colors appear more natural and vibrant. | 90+ for task areas; 80+ for general ambient. |
| CCT (Color Temperature) | Psychological tone and alertness; influences mood and circadian rhythm. | 4000K to 5000K for desks and active work; 2700K to 3500K for break/lounge areas. |
| Beam angle | Light spread and coverage; narrow beams for spotlights, wide beams for floodlights. | 60° to 120° for general areas; narrower (e.g., 25-45°) for accent or specific task lighting. |
| Dimmability | User and energy control; allows adjustment to personal preference and task. | Required for all task lights; highly recommended for ambient layers. Look for "smooth dimming" to avoid flicker. |
| Lumen output | Raw brightness of the light source; determines how much light is produced. | Matched to lux calculation for desired illuminance; avoid over-lamping. |
| UGR (Unified Glare Rating) | Measures uncomfortable glare; lower numbers indicate less glare. | Typically <19 for office environments, especially near screens. |
Pro Tip: Plan your control strategy – dimming capability, occupancy sensors, scene presets, smart home integration – *before* selecting fixtures. Retrofitting controls after installation is expensive, often incomplete, and less efficient. Specify it from day one, considering both individual user control and overall energy management.
Managing Glare, Workstation Layout, and User Control
Even a perfectly specified lighting system with the ideal CRI and CCT will fail if workstations are arranged poorly relative to the fixtures above them. Glare is the number one complaint in office lighting, and it's almost always a placement problem, not solely a product problem. Addressing it is a critical workflow step, not an afterthought. It's about how light interacts with your eyes and your screens.
Reflected glare from screen-based workstations is directly mitigated by how you place luminaires relative to workstations – screens should never sit directly beneath luminaires that concentrate high luminous flux downward toward the screen plane. This creates harsh hotspots that strain the eyes and wash out screen content. Direct glare from windows or unshielded fixtures is equally problematic.
Practical glare management strategies include:
- Reorient Workstations: This is often the cheapest and most effective fix. Position monitors so they face perpendicular to windows (side-on) rather than directly toward or away from them. This minimizes both direct sunlight glare and reflected sky glare.
- Shift Overhead Fixtures: If possible, rearrange or select fixtures so their primary lumen output falls onto the desk surface, not directly onto the monitor face or into the user's eyes. Consider fixtures with diffusers or parabolic louvers to soften and direct light.
- Utilize Indirect or Semi-Indirect Fixtures: For ambient layers, consider luminaires that bounce light off ceilings and walls. This creates a softer, more even illumination that reduces harsh downward hotspots and minimizes glare.
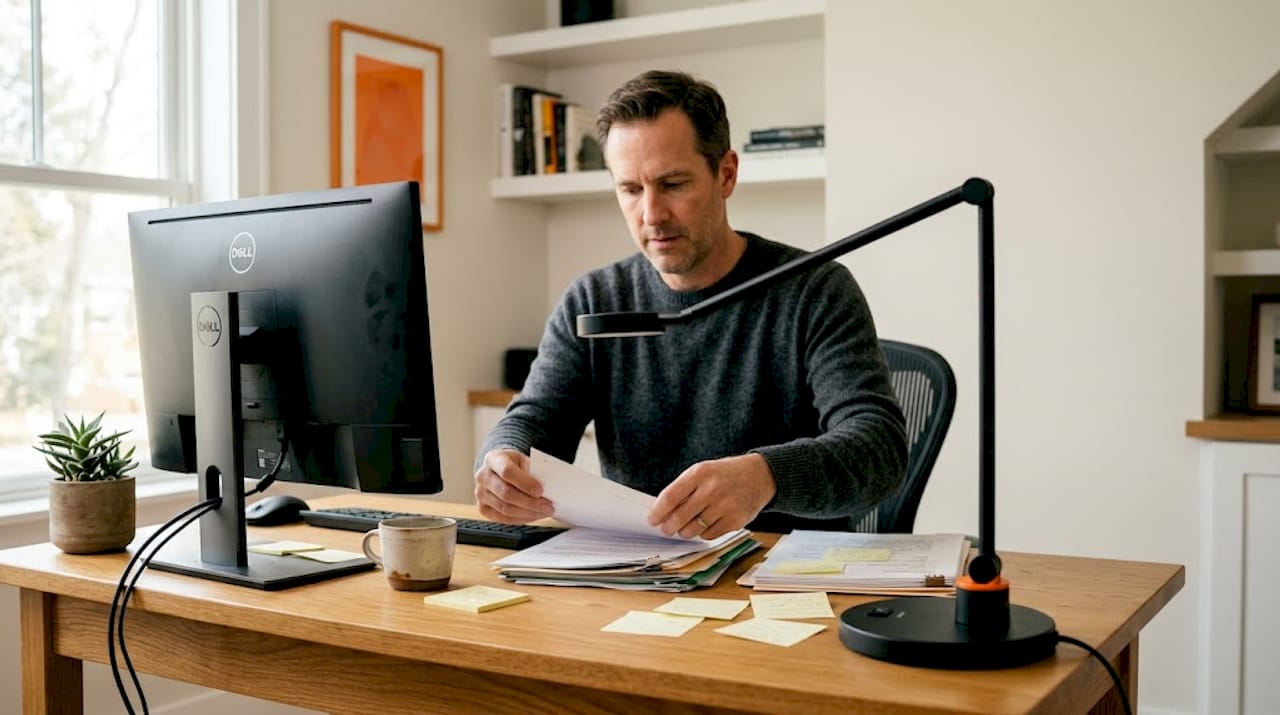
- Embrace Task Lighting: Adopt a task lighting guide approach: use articulated desk lamps or floor lamps that let each person direct light exactly where they need it, at the intensity they prefer, rather than relying exclusively on overhead sources. This puts control in the user's hands.
- Apply Anti-Glare Screens & Window Treatments: When repositioning isn't possible, high-quality anti-glare screens on monitors can help. For windows, consider blinds, shades, or even strategically placed sheer curtains to diffuse natural light without blocking it entirely.
“Screen/workstation arrangement can contribute to limiting reflected glare. Do not leave screens directly underneath luminaires with high luminous flux toward the bottom in a concentrated fashion.”
User control is equally powerful, often overlooked, and incredibly empowering. When occupants can easily adjust their own lighting conditions – dimming a task lamp for a video call, brightening it for detailed drawing, or adjusting the color temperature to suit their mood or the time of day – comfort and productivity both improve measurably. Beyond individual control, occupancy and vacancy sensors integrated into the lighting strategy ensure lights are never left on in empty spaces, cutting energy waste without any behavioral change required from your team. For remote workers managing their own home office lighting tips on a budget, a single high-quality articulated desk lamp with a built-in dimmer and adjustable CCT is often the single highest-impact upgrade available.
Explore curated options for your setup with our modern office lighting collection, which features fixtures designed specifically around glare reduction, user adaptability, and sleek aesthetics.
Bringing in Daylight: Automating, Harvesting, and Verifying
With your fixtures and controls thoughtfully in place, the next layer of sophistication – and one that pays significant dividends in both energy efficiency and occupant well-being – is integrating daylight harvesting into your strategy. Natural light isn't just free; it's the gold standard for color rendering, circadian rhythm support, and overall visual comfort. The goal is to make electric light work *with* daylight rather than competing against it, creating a dynamic, responsive environment.
The professional daylight harvesting workflow for perimeter zones (areas near windows) centers on automating dimming in areas that receive significant sunlight and then rigorously verifying that those controls function as intended in real-world conditions. As the GSA’s high-performance buildings guidance makes clear, automated dimming and functional commissioning are behavioral requirements, not just hardware requirements. Installing the sensor is not the same as validating that it works correctly and consistently.
Here's how to execute this crucial phase:
-
Map Your Daylit Zones: Identify which areas of your office receive meaningful natural light for more than four hours per day. These are your prime candidates for daylight-responsive dimming controls. Consider how far light penetrates into the space from windows.
-
Install Photosensors and Program Dimming Curves: Place photosensors strategically where they can accurately measure ambient light levels (avoiding direct sunlight). Program your lighting control system to gradually reduce electric light output as daylight increases, maintaining a consistent, desired illuminance target at the work surface without jarring transitions or noticeable steps in brightness. This smooth transition is key to user comfort.
-
Commission with Real-World Testing: This step is non-negotiable. After installation, visit each sensor zone at multiple times of day and under different sky conditions – overcast, partly cloudy, full sun. Document whether the electric light level responds correctly and smoothly to changes in natural light. Adjust sensitivity and dimming curves as needed until optimal performance is achieved.
-
Test Seasonal Behavior: Sun angles change significantly between winter and summer, affecting the amount and direction of natural light entering a space. A calibration that works perfectly in June may leave perimeter zones underlit or over-lit in December. Schedule a re-check and recalibration each equinox to ensure year-round performance.
-
Monitor and Recalibrate as the Space Evolves: Your office isn't static. New furniture, rearranged workstations, fresh window film, or added partitions (even plants!) all change how light reaches sensors and surfaces. Build a recurring review into your facility management calendar – perhaps quarterly or semi-annually – to ensure the system remains optimized.
Pro Tip: Assign a named individual – not just a team or department – responsibility for semi-annual workspace lighting step-by-step commissioning checks. Accountability by name is what actually gets things done and ensures your investment in controls continues to pay off.
Why Most Office Lighting Workflows Fall Short (and What Really Matters)
Here's the uncomfortable truth we see play out constantly: most organizations treat a lighting upgrade as a purchasing event, not a holistic design process. Someone orders "better" bulbs. Maybe they swap in new LED panel fixtures. The results are underwhelming, perhaps even creating new problems, so they conclude that "lighting just doesn't matter that much." But